17 Hottest Acrylic Christmas Nails 2025
I’ve had the pleasure of trying out a few of these festive acrylic nail designs, and each one brought something unique to the table.
The Gift-Box Bows in Classic Red and Green were a showstopper and the metallic gold bows really gave it a polished feel without being too flashy.
The Snowflake and Peppermint Skittle Set was another favorite; the combo of red, green, and delicate snowflakes felt refined, perfect for holiday parties.
What stood out most was how comfortable the acrylics were, with the designs lasting beautifully through all my holiday activities.
In this post, I will go over 17 trendy Christmas acrylic nails.
Festive Acrylic Christmas Nails
After covering the red Christmas nails, acrylic nails are the next big thing during holidays.
1. Evergreen French with Candy-Cane Accents
This festive look pairs rich pine green with shimmering nude for a soft French curve, then adds a playful touch with crisp white snowflakes and peppermint stripes on two nails.
The deep green is festive, while the striped accents bring a fun, graphic element.
This design combines classic Christmas nail colors, like acrylic red, with raised patterns for office celebrations.
I recommend using opaque emerald gel like The Gel Bottle Inc’s Amazon, paired with bright white OPI Alpine Snow and classic red OPI Big Apple Red for best results.
For acrylic nails, opt for a reliable system like Young Nails Core Clear along with forms or tips to create structure.
Finish with a high-gloss, no-wipe top coat. Thin lines for the peppermint stripes are a must, so use the smallest liner brush you can find.
Start by shaping your acrylic nails to a soft square. Apply a base coat, then use a detail brush for the paint, cure, and finish one nail with twinkling micro-glitter to add dimension.
Carefully cut candy-cane accents in red and white, spacing them evenly.
Celebrity manicurists always emphasize the importance of thin layers for smoother, longer-lasting results. I recommend applying two whisper-thin layers for the best finish.
This design is my go-to for a holiday look. The green works well with any outfit, and the soft square shape is versatile enough for both short and long nails.
2. Matte Tartan in Red and Forest
A bold scarlet base forms the backdrop for a plaid pattern in red, dark green, and subtle off-white lines.
This design evokes the cozy feel of your favorite blanket scarf, but with a grown-up twist. The long square shape sharpens the plaid pattern, keeping it sleek and stylish.
It fits perfectly under the categories of Christmas nails in acrylic red, square shapes, and cold-weather designs.
For this one, I rely on Valentino Beauty Pure acrylic for structure, topped off with a matte finish using OPI Matte Top Coat.
The colors I use are CND Shellac Devil Red and Gelish Are You Feeling Bouquet (a rich hunter green), along with a fine off-white striping polish.
A steady hand and a fine striping brush are essential for the precise lines required.
First, cut and shape the acrylic nails into a sharp square. Apply two coats of the fiery red, then lightly sketch the plaid grid with off-white.
Add alternating lines of green and deeper red in varying thicknesses. Finish with a matte top coat.
A pro tip I picked up from an NYC manicurist is to float the matte top coat. Please don’t press the brush down, or you’ll get visible lines. Small adjustments like this result in a cleaner finish.
Tartan designs are perfect for chilly days spent in wool coats and grabbing coffee.
The pattern is trendy, and if you prefer a little shine, swap one accent nail with a glossy top coat for a refined look.
3. Holly Sprigs and Snowflake Neutrals
Satin-matte green nails bookend two neutral nails adorned with white snowflakes and tiny holly leaves, each with a red berry.
The color palette is muted yet festive, making this design versatile enough for brunches, school concerts, or even holiday office parties.
It’s a modern take on classic Christmas colors, combining acrylic green with crisp white for a fresh winter look.
For this, I prefer Mia Secret Acrylic Clear as the base, paired with a soft nude gel like Apres Bunny Slope and a rich evergreen gel such as OPI Deck the Halls.
To create the holly leaves and snowflakes, I use a fine detail brush and a micro dotting tool for the berry accents.
After building the acrylic, paint the outer nails with matte green and the middle nails with nude.
Cure the layers, then start sketching the snowflake spines, working towards the center of the nail.
Follow up with the holly arcs and dot the berries in place. Cure again and seal the design with matte on the green nails, and a glossy or velvet top coat on the decorative nails.
Many professionals recommend using cuticle oil twice a day during colder months to prevent lifting, and I keep one by my sink as a reminder.
This design is perfect for when you want something elegant for pairing with cream sweaters.
4. Glitter Gift Wrap with Minimal Red Bows
Micro-glitter in silver covers short, rounded acrylic nails, each adorned with a single, graceful red bow, creating an understated holiday look.
The design is simple for office Secret Santa days or when you want some sparkle without going overboard.
For this style, you’ll need a high-quality holographic glitter gel like Bio Seaweed Gel’s Fairy Dust, a bold red like Essie Really Red for the bows, and a thin liner brush.
When it comes to the structure, Young Nails Core is my go-to, paired with Gelish’s Top It Off for a long-lasting, glossy finish.
To start, apply two thin coats of glitter and allow it to dry. Then, use your liner brush to create a ribbon loop and tails close to the cuticles or in the center of each nail.
To prevent wrinkling, flash-cure between layers. I always follow Julie Kandalec’s advice—apply glitter gels in thin layers and cure quickly to keep things smooth.
The beauty of this design is in its simplicity. It works with any outfit, from casual to formal.
5. Frosted Red and Green Stripes with Snowflakes
A simple but striking design featuring alternating red and green stripes, accented with delicate white snowflakes.
The colors are bold yet not overpowering, creating a playful yet refined holiday vibe. This design is versatile. So, it’s a great choice for more formal holiday events.
It combines the best of classic Christmas colors with a touch of winter magic.
For the perfect finish, use a red gel like OPI Big Apple Red and a green like Gelish’s Are You Feeling Bouquet. A fine detailing brush is essential for the delicate snowflake accents.
Apply a base coat and shaping the nails. Alternate the red and green stripes across the nails, ensuring they are crisp and even.
Use a fine brush to add snowflake details, and cure each layer before applying a top coat to seal everything in place.
A matte finish would give it an extra touch of elegance, but you can always go for a glossy top coat if you prefer more shine.
This design is a great choice for anyone looking for something bold. The striped pattern keeps it modern and fresh while still being undeniably festive.
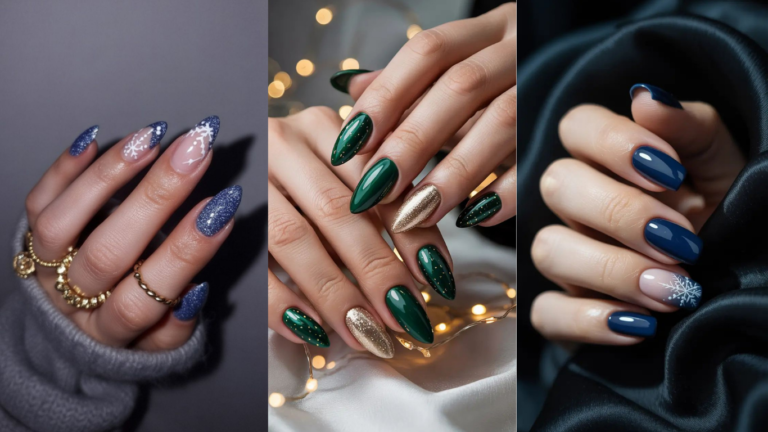
6. Evergreen Ombre with Silver Snowflakes
I prefer the elegance of deep evergreen blending into a rich cranberry red. It adds a touch of class without feeling overly festive.
This smooth ombre design, finished with delicate silver snowflakes, is both sleek and modern.
The contrast between the matte base and metallic accents keeps the look fresh and contemporary.
If you’re looking for wearable Christmas nails that aren’t too loud, this design is a timeless winner.
To achieve this look, I use OPI Big Apple Red, OPI Stay Off The Lawn for a woodland green, and a fine silver foil or stamping foil for the snowflakes.
Acrylic nails are first covered with a rubberized base, then finished with a self-leveling glossy top coat that seals in the design.
Guys that prefer a softer look, swap out the glossy finish for a velvet matte top coat on a nail or two for added contrast.
The process is simple. Blend the red and green with a small sponge to create a soft ombre on the middle nails.
Stamp or hand-paint the snowflakes with a striping brush and metallic gel. Thin coats are essential here to avoid bulk.
I never topcoat snowflakes until they’re dry to maintain crisp lines. Short on time? Choose two statement nails with the snowflakes and keep the others solid for a simpler, still-glamorous look.
I love wearing this when I’m bundled in a sweater. During the holiday season, this design feels perfectly balanced.
The coffin shape elongates my fingers, and the metallic accents catch the party lights. It’s a great choice for casual office parties, holiday shopping, or New Year’s Eve toasts.
7. Velvet Red with Candy-Cane Stripes
These nails feature a rich, velvet matte red base adorned with glossy candy-cane stripes in soft pink and red, finished with a touch of glitter. The pattern never feels too over-the-top.
The medium-to-long nails are tapered in a way that’s neither too almond nor too coffin, making them perfect for those who love festive nails without the fuss.
For this design, I use a matte red gel as the base, Essie Gel Couture Sheer Fantasy for the soft pink, and a micro-glitter gel for the sparkly stripes.
A long liner brush is essential for the precision of the diagonals, and a glossy top coat is applied only to the striped nails to enhance the contrast between matte and shine.
The process is straightforward. Start with two thin coats of red, then apply a matte top coat on the solid nails.
For the accent nails, paint the pink diagonal stripes first, cure, then add the red stripes, cure again, and finish with a thin line of glitter.
Keep pressure light when applying the lines to avoid them becoming too thick. For a shorter wear, trim the nails into a clean short almond shape and make the stripes more compact.
I wore this design to a cookie swap, and people were asking for my nail tech’s contact info by the end of the night. It’s amazing for the busy December holiday season.
8. Ribbon Bows on Glossy Cherry Red
These nails combine the elegance of glossy cherry red with perfectly crafted white ribbon bows. The squared silhouette emphasizes the clean lines of the bows, while a single snowflake adds a seasonal touch. This design works beautifully for those who prefer neat, polished looks and can easily be adapted for short square nails, making it office-friendly.
For this design, I use Gelish Good Gossip for the bright red base, a white gel paint for the bows, and a short detail brush to outline the loops and tails.
The bow centers are created using a dotting tool, and the whole design is sealed with a high-gloss top coat to achieve that candy-apple shine.
Drawing bows at home is easier than it seems. Trace out the loops in teardrop shapes, add thin tails, and finish with a dot in the center.
Keep the white paint thin so it doesn’t overpower the red. To ensure durability, apply top coat over the free edge, especially on short square nails that are constantly in use.
I return to this design when I want something elegant and beautiful without the glitter. It photographs beautifully under cafe lighting and complements everything from wool coats to satin slips. It’s like wearing a classic holiday card, but in nail form.
9. Modern Tartan Mix with Ruby Glitter
This design starts with a rich merlot red base, and the accent nails play with pattern in an unexpected way.
One nail features a tartan stripe framed with a thin gold line, while the other is covered in ruby glitter.
The compact shape of the nails adds a stylish, practical element, making this a chic choice for those who want Christmas nails in a shorter length without sacrificing designer flair.
For tools, I use deep red gel for the base, black, white, and forest striping gels, and micro gold tape for the intricate lines.
To seal the glitter, I apply a thick layer of packed red hex glitter and finish with a heavy top coat to tidy up the edges.
To create the tartan, I first draw white parallel lines, let them dry, then add thin black and green tartan lines for depth.
The gold edge gives the design a luxurious touch. For the glitter nail, apply a thick layer of glitter gel, followed by a heavier top coat for a clean, polished finish.
This design is perfect for those who want to wear plaid without it looking messy. I wore this during a holiday market and was surprised when my hands matched my scarf.
It’s a design that elevates every cup of coffee and adds a bit of sophistication to any outfit.
10. Candy-Ribbon Swirls on Rounded Shorties
Cranberry red takes center stage here, with swirly white and emerald ribbons curving diagonally across the nails.
The organic, curvy lines create a relaxed, comfortable look that’s perfect for busy holiday weeks. This design is ideal for those who prefer shorter acrylic nails but still want a festive, creative touch. It’s cute, crisp, and office-friendly.
For materials, I use a rich red gel, a bright white liner, and a cool green liner for the swirls.
A medium round brush helps create the base, and a long striping brush is used to add the arcs.
If you want a French-tip effect, move the swirl closer to the tips to create that vibe.
Start by applying the red base and curing. Then, draw two short ribbon swirls at opposite ends of the nail, meeting in the middle.
Keep your hand stable by resting it on the table to maintain smooth, even curves. Finish with a glossy top coat for durability.
When I need nails that keep pace with real life, this is my go-to design.
Whether you’re drawn to the sleek ombre, velvet candy stripes, or the ribbon swirls, just let me know your preferred length and style, and I’ll create the perfect Christmas nails to match your vibe.
11. Gift-Box Bows in Classic Red and Green
The nails are adorned with deep scarlet and pine green shades, each topped with a delicate metallic gold bow in the center. The bows are complemented by snowfall-like white dots scattered across the surface.
The design is done on a smooth medium square shape, offering a polished look that is ideal for winter parties.
It is a cute take on Christmas nails, incorporating both red and green in a balanced way without overwhelming the eye.
This is a perfect example of Christmas nails acrylic red, Christmas nails acrylic green, and Christmas nails acrylic square designs that maintain elegance while still embracing festive cheer.
To achieve this look, I use Young Nails Core Clear, OPI Big Apple Red, and OPI Stay Off the Lawn for the red and green colors, while the bows are created using Daily Charme gold bow stickers.
For the snowflakes, I use OPI Alpine Snow and a dotting tool. A glossy no-wipe top coat seals everything into a smooth, glass-like finish.
Application Tips:
- Build the acrylic with a clean, smooth square shape.
- Apply two thin coats of color, then cure.
- Place the bow decals in the lower third of each nail, positioning them symmetrically for a jewelry-like effect.
- Add evenly spaced white dots around the bows for a snow-like feel.
- Finish with a top coat to protect the design and ensure longevity.
This design is perfect when you want an effortless, chic holiday look with minimal decisions.
Whether you’re wearing a red sweater or a black slip dress, these nails will seamlessly match.
For a less sparkly look, swap the metallic gold bow for a classic French tip gold accent for a more understated vibe.
12. Candy Shop Mix with Gold Accent
A feminine almond-shaped set that features diagonal red and green peppermint stripes, balanced by a full gold accent nail.
The combination of candy-cane stripes with the sleek, shiny gold creates a striking contrast, making this design ideal for those who want festive nails with a designer flair.
The almond shape enhances the elegance of the design, elongating the fingers while maintaining a light-hearted, classic feel that is both trendy and timeless.
For materials, I use Valentino Beauty Pure acrylic, OPI Alpine Snow gel, and Gelish Just In Case Tomorrow for the red. The green is The Gel Bottle Inc Amazon, and Lecente Stardust glitter gel provides the full-coverage gold accent.
Application Tips:
- Shape the acrylic into an almond form.
- Apply the red and green gel colors, curing after each layer.
- For the diagonal stripes, use a super-fine liner brush to create crisp lines and space them slightly apart for a chic, balanced look.
- Apply a full coverage of gold on one nail to add a touch of luxury.
- Flash cure the stripes for 5-10 seconds to freeze the lines, then finish with a top coat to lock everything in place.
This set is perfect for those cozy December movie nights or holiday parties, where you want an effortlessly glamorous look without overthinking it. The gold accent ensures that it remains festive but doesn’t feel too busy, making it an ideal choice for pairing with both casual and more dressy outfits.
13. Snowflake and Peppermint Skittle Set
This festive set features a combination of red, green, and white with alternating peppermint stripes and snowflakes. The design is both easy to wear and charmingly seasonal, with the alternating colors creating a soft and comfortable vibe.
The shorter, soft square shape makes it suitable for everyday wear while still adding a touch of holiday magic. It’s the perfect example of Christmas nails acrylic short, Christmas nails acrylic square, and Christmas nails acrylic designs that are both trendy and functional.
To recreate this design, I use Mia Secret Acrylic Clear, OPI Big Apple Red, and CND Shellac Palm Deco for the green color, along with OPI Alpine Snow for the white accents.
Application Tips:
- Build the acrylic and shape into a soft square.
- Apply the red and green colors, curing after each coat.
- Use a dotting tool to place snowflakes on alternating nails.
- For the peppermint stripes, use an ultra-fine liner to create diagonal lines in alternating red and green.
- Finish with a glossy top coat to seal in the design and ensure long-lasting wear.
This set is perfect for the busy holiday season, offering a combination of energy and elegance without being overly flashy.
The simplicity of the design allows it to pair well with everything from denim to cable knit sweaters, while the snowflakes add just the right amount of wintery charm.
14. Storybook Holly, Snow, and Candy Canes
These almond-shaped nails are a festive canvas for alternating deep green and bright red shades, with holly springs, snowflakes, and candy canes making an appearance throughout.
The addition of glittery accents adds sparkle and festivity, making this design feel like a tiny holiday story right on your fingertips.
It is a perfect representation of Christmas nails acrylic designs, Christmas nails acrylic green, and Christmas nails acrylic red with a cute and cheerful vibe.
For materials, I use Kiara Sky Cover Nude as a delicate base, OPI Alpine Snow for the white, OPI I’m Not Really A Waitress for the glowing red, and Gelish Are You Feeling Bouquet for the forest green.
A red-green micro-glitter gel is added for sparkle.
Application Tips:
- Build and shape the acrylic, applying two thin layers of color.
- Allow the base colors to dry, then use a liner brush to add holly leaves and berries, a dotting tool for the berries, and a fine line for the candy cane.
- Apply glitter at the tips for a little added sparkle.
- Seal everything with a top coat to ensure the design lasts through the season.
This design works perfectly for a festive shopping trip or holiday gathering.
If you want a more minimalist look, you can opt for just two nails with the art, leaving the rest solid red or green.
Either way, it’s a cheerful and fun design that’s easy to wear without too much maintenance.
15. Holly Micro-French on Sheer Nude
A sophisticated, minimalist design featuring a sheer nude base with little holly sprigs at the tips in a delicate micro-French style.
The design is elegant and light, with the holly leaves providing just enough holiday spirit without being too overwhelming.
It is preferred by those who like Christmas nails acrylic simple while still embracing the season. The almond shape adds refinement, and the overall look is graceful yet festive.
For materials, I use Valentino Beauty Pure acrylic, Apres Nude as the sheer base, Gelish Are You Feeling Bouquet for the green, and OPI I’m Not Really A Waitress for the red berries.
Application Tips:
- Shape the acrylic into an almond form.
- Apply two thin layers of sheer nude, curing after each.
- Use a micro-liner to create tiny holly wreaths around the tips, placing berries in a balanced pattern.
- Finish with a thin, smooth top coat to maintain the negative space and keep the design crystal clear.
This design is perfect for dressy December events, offering a light, minimalist touch to any outfit. It can easily transition from an office-friendly look to an evening cocktail party ensemble. For a little extra glam, you can add a gold French tip on the ring finger.
16. Crimson Snowstorm on Sleek Coffins
The long coffin-shaped nails are painted in deep cherry red, with white snowflakes and delicate dots scattered across the surface.
The negative space between each snowflake adds a breath-taking elegance, while the glossy finish gives the design a festive holiday sparkle.
This design is perfect for those who want Christmas nails acrylic red in a more polished, editorial style, offering a winter glam look with a sophisticated edge.
To achieve this, I use OPI Big Apple Red, JINsoon Absolute White for the snowflakes, and a dotting tool to create the snowflake patterns.
A rubber base ensures that the acrylics stay in place and don’t chip, while Gelish Top It Off provides a glossy finish that seals the design.
Application Tips:
- Apply two coats of deep red acrylic and cure.
- Use a liner to create the snowflakes, beginning with a central hexagon and drawing thin arms.
- Add dots for extra detail.
- Finish with a top coat to lock everything in place and maintain a shiny, long-lasting finish.
This is the perfect statement set for holiday parties or dinners, adding a touch of glamour to your ensemble without being overly fussy. The sleek coffin shape and delicate snowflakes create a striking, polished effect that suits any festive occasion.
17. Soft Candy-Cane Mix with Glitter Pebbles
This soft, elegant design features a nude base with diagonal candy-cane red and white stripes, paired with champagne glitter and tiny red rhinestones for a festive touch.
The short, square shape makes it wearable and practical, while the subtle embellishments add just the right amount of sparkle for a cute and approachable holiday look.
For materials, I use Olive & June CCT for the sheer pink-nude, saturated scarlet for the red, and vivid white liner for the stripes. Champagne glitter gel and 1-2mm crystal rhinestones complete the look.
Application Tips:
- Start with a nude base, curing as you go.
- Use a fine liner to create diagonal red and white stripes, making sure the lines are neat and not too thick.
- Add a thin glitter line and place rhinestones into a wet top coat, curing to secure them in place.
- Finish with a full cure for long-lasting results.
This set is perfect for those who want a practical design that won’t interfere with daily activities.
Whether you’re running errands or attending a holiday gathering, these nails will keep you festive without being too over the top.