Best Red Christmas Nails To Copy- They’ll Inspire Your Holiday Look
The holiday season is a time to embrace festive joy. Christmas marks the time for cozy gatherings, sparkling decorations, and plenty of holiday cheer.
Red adds vibrancy to any celebration and red nails aren’t an exception. I love how they bring a pop of color and excitement.
In this post, I’ll walk you through the top red Christmas nails that I have tried in the past and worth trying out.
Red Nail Designs For Christmas
Candy Cane Stripes on Short Nails
A playful twist on the classic red Christmas nails, this design features soft round nails lacquered in a rich cherry red, with diagonal white stripes for a joyful vibe.
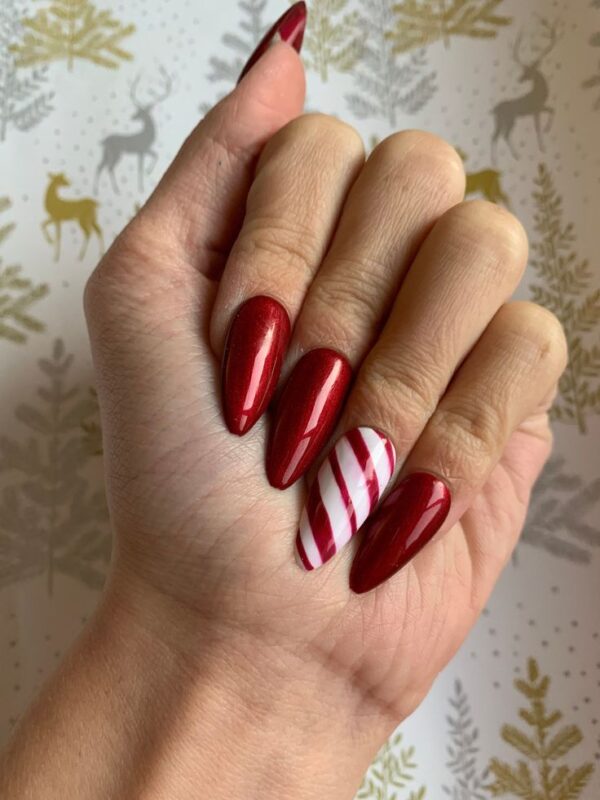
The stripes vary in size, maintaining a crisp aesthetic. The glossy finish gives the look a fresh-out-of-the-salon feel.
This design is perfect for those seeking festive nails that aren’t too over-the-top but still add a touch of holiday spirit.
For this design, I recommend using OPI Big Apple Red or Essie Gel Couture Rock the Runway for the red base, paired with OPI Alpine Snow for the white stripes.
To achieve clean stripes, use a liner brush, and finish with a high-gloss top coat like Seche Vite or Essie Gel Setter. It’s easy, fun, and works perfectly with holiday outfits.
To apply, start with two coats of red polish, letting each coat dry completely. Use the striping brush to draw diagonal white strokes from the cuticle to the free edge.
Celebrity manicurist Julie Kandalec advises floating the brush above the polish to keep the lines smooth and clean.
Seal with a top coat and finish by swiping the free edge to prevent chipping. This design is versatile and pairs well with everything from ski jackets to satin slips, giving a festive statement.
Rudolph the Red-Nosed Reindeer Accent
For a more whimsical holiday look, this design focuses on a single playful Rudolph character on each nail.
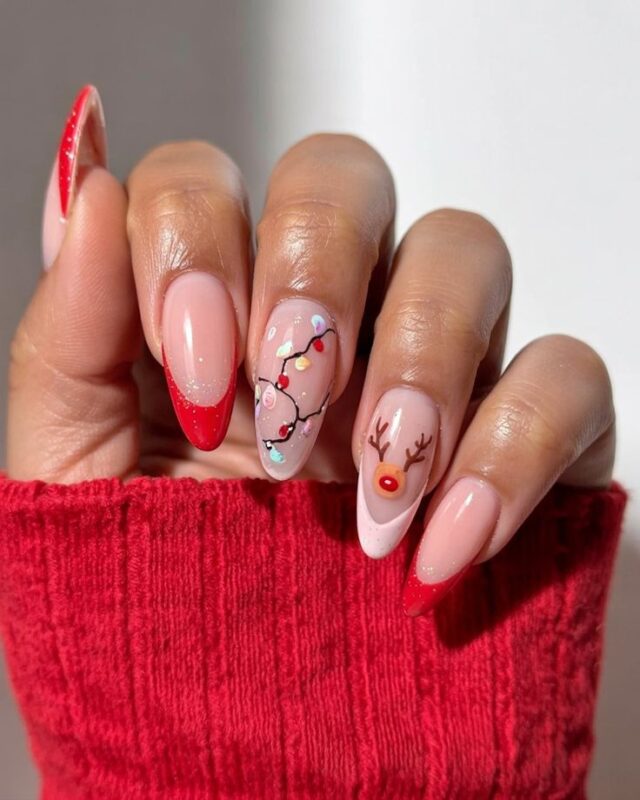
The red base is complemented by a reindeer face with a bold red nose and black eyes. The design is cute and its short squoval shape makes it suitable for office settings.
To create this look, I prefer Essie Bordeaux or CND Vinylux Decadence for the deep cherry red.
For the reindeer, use OPI Alpine Snow for the white background, a black gel paint for the antlers and eyes, and a dot of bright red polish for Rudolph’s nose.
The key is simplicity – draw the face in the center, cure, then add the eyes and antlers.
This design wins when you want something festive without committing to full-on character nails. It’s an easy way to show holiday cheer, and it draws attention even from a distance.
Snowflakes on Almond Nails
Almond-shaped nails naturally evoke a sense of elegance, and this design enhances that by pairing crystal-clear red with delicate white snowflakes.
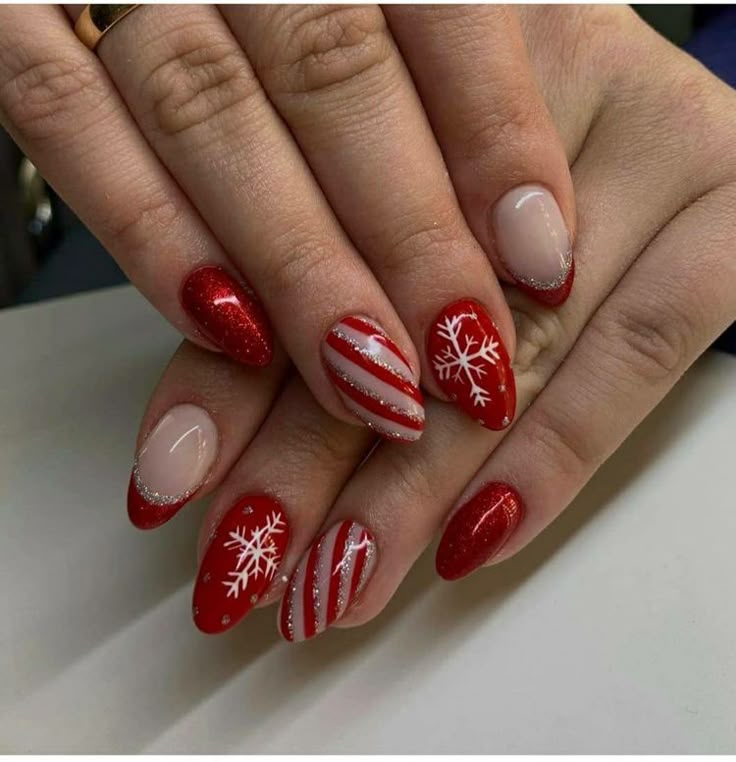
The snowflakes are fine and airy, created with dot-and-drag strokes, ensuring the red base remains the focal point. It’s a timeless look with a 2025 polish finish that feels incredible.
I recommend Bio Sculpture Pillar Box Red or Apres Gel Coupeur A-Red for the base. For the snowflakes, use a thin liner brush and a dotting tool with high-pigment white gel paint.
Going forward, Top with CND Shellac No-Wipe Top for a glassy, camera-ready finish. A small dot of micro-glitter in the center of each snowflake adds a sparkle without being overpowering.
To apply, create an X in the center of the nail, then add intersecting lines and tiny dots at the ends to form the snowflake pattern.
Nail artist tip: position the design towards the top third of the nail to make it appear longer. Finish with two layers of top coat to ensure durability. This look is for a feminine holiday dinner and pairs with rings and a romantic ambiance.
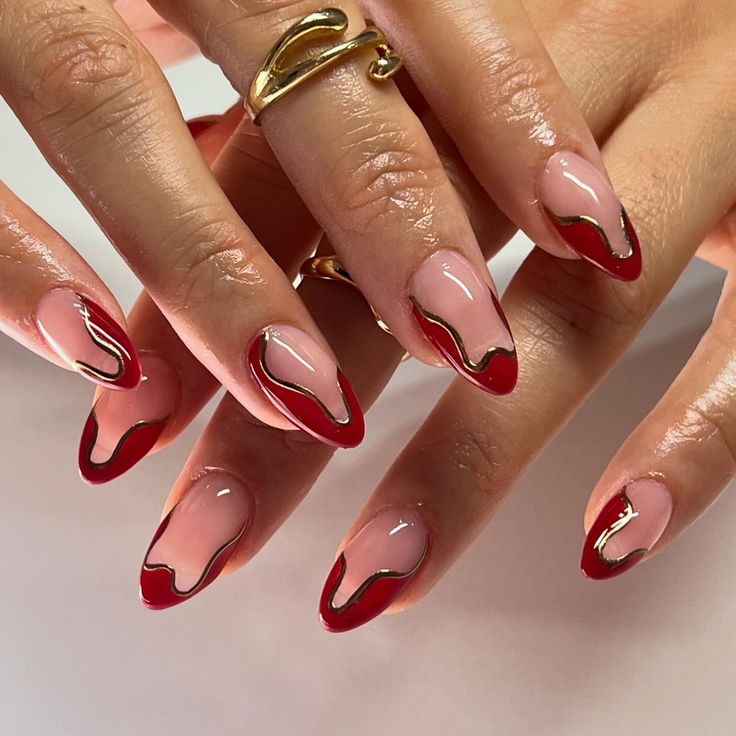
Gift-Wrap Bows with Gold Accents
This design combines the classic red Christmas nails with metallic gold bows for a touch of luxury.
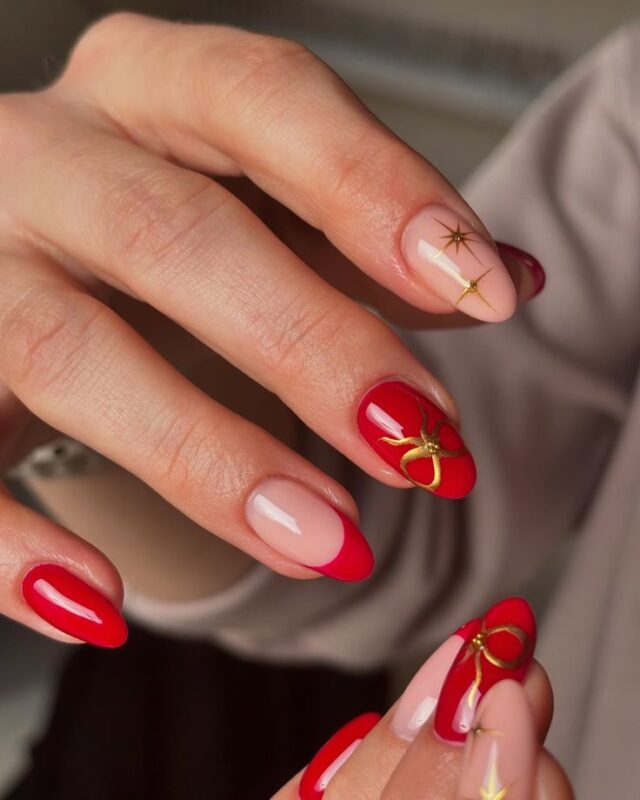
The red almond-shaped nails are adorned with small, off-center gold metal bows, making the design look more like jewelry than a simple nail decoration. It’s festive, and the gold adds a luxe vibe to the cherry cream base.
For the base color, Chanel Le Vernis 147 Incendiaire or Lights Lacquer Cherry Jelly works well.
Attach the bow charms using a bead of builder gel or nail resin, and finish with a high-gloss top coat to seal the design. Ensure the edges are smooth by filing down any sharp metal corners.
This look suits parties where you want to make a statement without having to constantly touch up your nails.
The gold accents add a glamorous touch, while the red background keeps the design classic. Pair it with satin, cashmere, and a bold red lipstick for a great holiday look.
Glittery Candy-Cane Coffin Nails
For those who love dramatic, long nails, these glittery candy-cane coffin nails are the ultimate festive statement.

The design features ruby red glitter alternating with peppermint-style diagonal stripes. The combination of bold red glitter and white lines creates a balanced look that’s not too busy, even with the dramatic coffin shape.
For this look, I recommend using Young Nails Core Clear and CND Retention+ for acrylics, or Kiara Sky Ruby Slippers for a glittery red base. If you prefer gel nails, Apres Natural Coffin tips with deep red glitter gel will work beautifully.
Apply thin layers of glitter and white stripes to create the candy-cane effect, then finish with a mirror-bright top coat.
To apply, file and shape the nails, then apply a clear base. Create the diagonal glitter stripes and add the candy-cane effect on the other nails.
Top off the design with a clear top coat to seal everything in place. This design favors holiday events where you want to turn heads.
Cherry Dot Snowfall on Short Nails
A clean design, these short nails are adorned with small round dots scattered across a glossy cherry base. The dots, spaced evenly, evoke the feeling of gentle snow flurries.
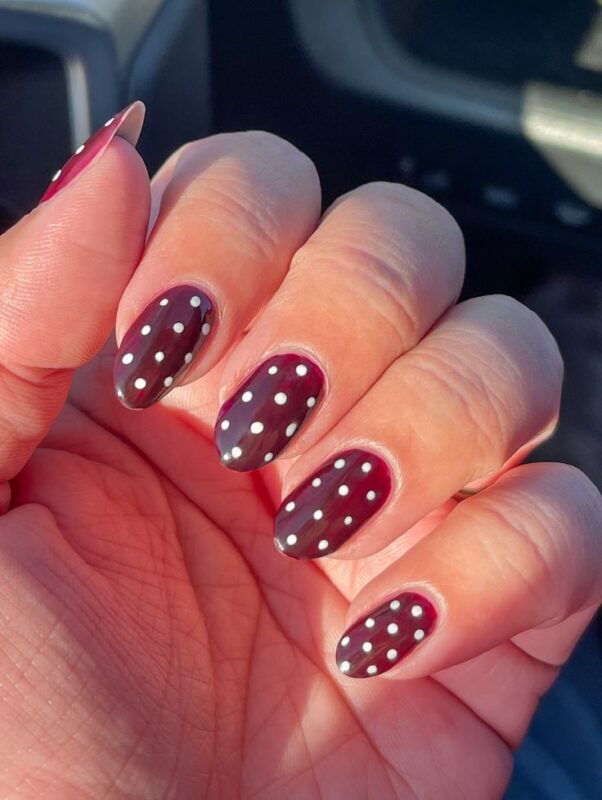
This festive style combines minimalism with holiday cheer for ladies who want a quick red Christmas nail design.
The white dots pop against the rich red background to offer a touch of wintery charm.
For the polish, I use OPI Big Apple Red or Lights Lacquer Cherry Jelly for the base, and Essie Blanc for the dots. To create the dots, I rely on a dotting tool with a small ball tip, ensuring even circles.
A high-speed glossy top coat finishes the look, ensuring smoothness and longevity. Start by applying two thin coats of red, then dot the white in a staggered pattern.
Remember to cap the free edge with top coat to prevent wear. This design pairs with thick knits for brunch or a satin slip for evening events.
Candy-Ribbon Swirls in Red and Green
A festive design that blends metallic ruby red with jewel-toned green in diagonal ribbon-like swirls, separated by a sharp white line for added contrast.

The swirls look especially smooth on almond-shaped nails, making this design stunning. It’s a design attractive for those seeking a dynamic and fashionable holiday look.
For the base, I prefer Gelish Red-y For the Holidays and Beetles Gel Cat Eye Emerald for the green. The white line is drawn using a razor-thin striping brush and white gel paint.
To achieve the metallic shine, apply a no-wipe top coat over the cured gel for a glossy, mirror-like finish. Start by carving out almond shapes, then apply the red or green on either side of the nail, curing the design as you go.
The key is applying thin layers to ensure the design doesn’t ripple. This design is perfect for a holiday dinner when you want to stand out in a subtle, classy way.
Velvet Cat-Eye Nails
Dark, luxurious ruby cat-eye nails with a velvet finish shimmer in the low light, broken only by a delicate bow accent for a touch of elegance.
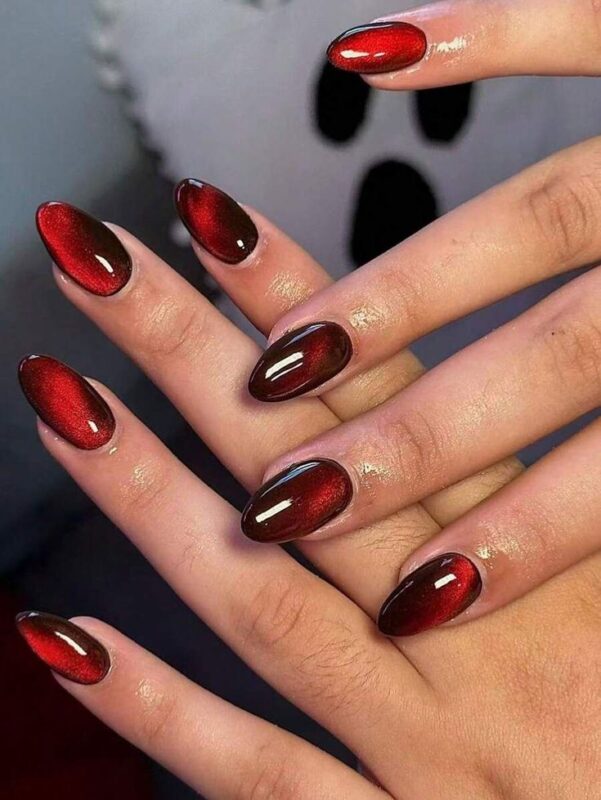
The long oval shape enhances the design’s graceful, dark romantic vibe, making it ideal for those who want a quiet yet festive statement.
This design combines the richness of the cat-eye effect with the charm of a small, simple bow for understated luxury.
I use Kokoist Cat Eye in Garnet or Born Pretty Wine for the deep ruby cat-eye base. A fine white gel liner is used to draw a tiny bow on the nail.
Applying the magnet before curing allows the light beam to create the cat-eye effect, while the bow adds a stunning detail.
For best results, apply two thin coats of the cat-eye gel, curing after each one. This look is fine for a fancy night out, where your nails can be the centerpiece of your ensemble, requiring minimal jewelry.
Peppermint Stripes & Snowflakes
A refined combination of bright ruby red and candy cane stripes, complemented by a delicate snowflake motif.
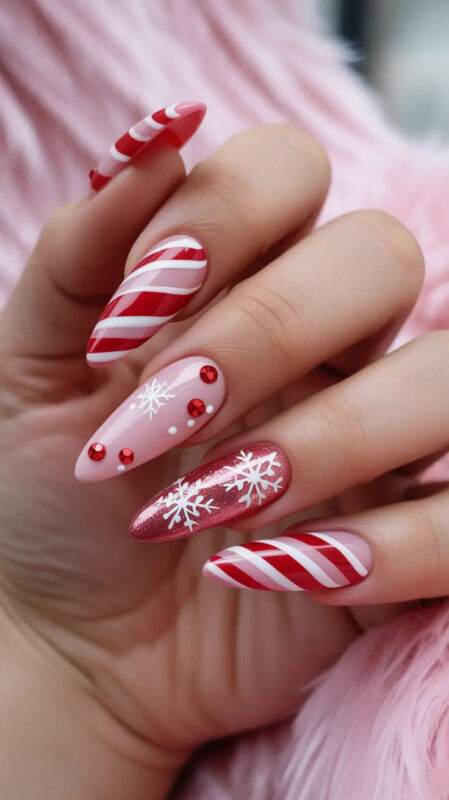
The stripes are sharp and crisp, while the snowflake adds a playful, seasonal touch. This design delivers festive cheer without being too loud, balancing metallic sparkle with the clean lines of the stripes and snowflake.
I alternate between OPI I’m Really An Actress for the warm ruby base and pure white gel paint for the snowflakes. Using striping tape ensures clean, crisp diagonal lines for the peppermint effect.
For this look, I normally use a stamping plate to avoid freehand difficulties. Start by laying down the white, curing it, then tape off the areas to create sharp red stripes.
The snowflake is dotted at the center, with thin arms extending outward. Seal with a top coat for a glass-smooth finish. This design is great for holiday office parties, offering a polished look.
Snowflakes on Glossy Cherry Squares
A traditional design, this look features snowflakes drifting across a glossy cherry gel base on square-shaped nails.
The square tips give the design a contemporary feel while maintaining the charm of classic holiday nail art. The snowflakes vary in size, creating a dimensional effect while keeping the design neat and streamlined.
For the base, I prefer Essie Fishnet Stockings or DND Cherry for a bold cherry color. I use water-slide decals or MoYou London stamping plates for the snowflakes, which makes the application quick and precise.
After applying two coats of cherry gel, I add larger snowflakes near the free edge and smaller ones by the cuticle to create a balanced look.
Finish with a thick top coat to seal in the design and enhance the glossy finish.
This design is good for dressy holiday gatherings, hence a reliable choice for the season.
Gilded Gift Set
Cherry red, crisp white, and molten gold come together in a festive design that includes a tiny bow, delicate snowflakes, and sparkling sequins.
The square-shaped nails, with soft rounded corners, help balance the design without feeling too bold.
The micro-glitter catches the light, creating a warm holiday glow, while the bow details keep the look chic and festive.
For the polish, I suggest using Essie Bordeaux for a deep red base, paired with OPI Alpine Snow for the white, and Kiara Sky Ruby Gold or Magpie “Holly” for the glitter.
Use a fine liner brush for the snowflakes and a dotting tool for the bow to create the accents.
The metallics stay bright and mirror-like with a no-wipe top coat. Apply two coats of red, followed by white on the accent nails, then add the bow, snowflakes, and glitter, ensuring the metal shines without dulling.
Celebrity manicurist Betina Goldstein’s tip to focus on the upper third of the nail helps elongate the fingers. Seal everything with a top coat to keep the design intact.
This set works wonders when you need a holiday look that’s festive but not over the top. Whether at a dinner or office party, it’s a design that’ll earn you compliments across the room.
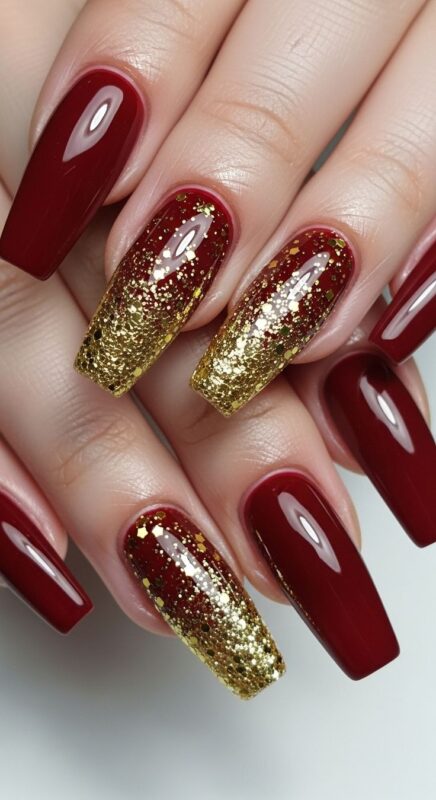
Golden Gradient Dip on Short Red Nails
Crimson red and soft gold glitter come together to create a stunning gradient effect. The gradient fades from the tips, giving the nails a polished look that’s simple.
This design works well with everyday sweaters, making it easy to wear throughout the season.
Start by applying OPI Big Apple Red or CND Vinylux Red Baroness for the base. Follow with a loose gold glitter like Essie Summit of Style or Zoya Bar.
Use a sponge or silicone stamper to apply the glitter and achieve a soft fade. To finish, add a glossy top coat like Essie Gel Setter or Seche Vite to seal the design.
Apply two coats of red and gently press the glitter at the free edge to create a smooth fade.
This is the ideal week-to-week manicure for December. It’s low-maintenance for women wanting a bit of glam without a lot of effort.
The gold glitter adds just enough shine to make it festive.
Classic Cherry with a Peppermint Stripe
A rich, true-cherry base with a candy-stripe accent on one nail creates a holiday look that’s stylish.

The design mixes timeless red with a neat white-and-red stripe, adding a playful touch without overwhelming the nails.
It’s a look that blends with rings or cozy knits, making it ideal for casual occasions.
For the base, I recommend Lights Lacquer Cherry Jelly or Chanel Le Vernis Pirate, with OPI Alpine Snow for the stripe.
The idea is using a striping brush to create neat lines. Finish with a no-wipe top coat for a glossy, camera-ready finish.
After applying two coats of red, use a thin brush to paint the diagonal stripes.
This design is my go-to for a brunch-to-cocktail transition. It’s simple yet festive, making it perfect for those who want a quick holiday look without too much fuss.
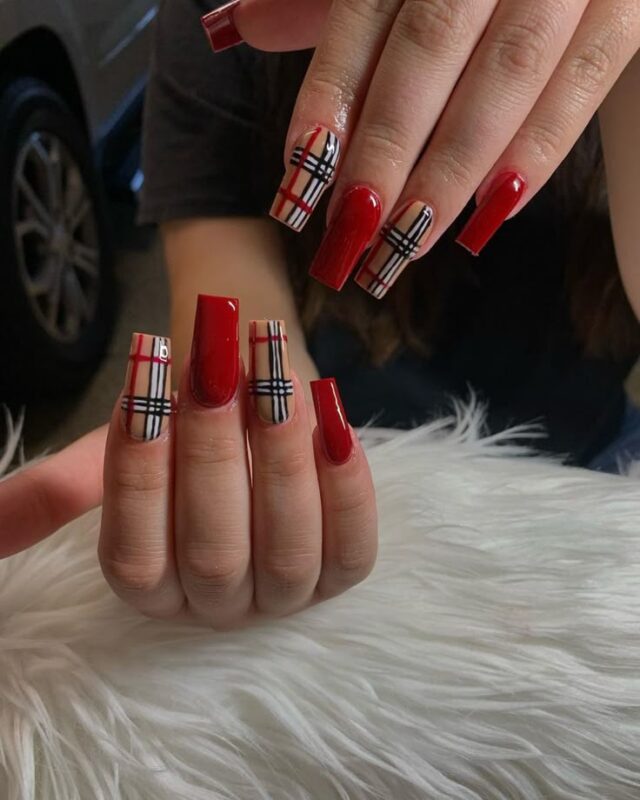
Red Almond Nails with Gold and Black
This design features dark red almond nails adorned with delicate gold and black plaid stripes, offering a warm feel.
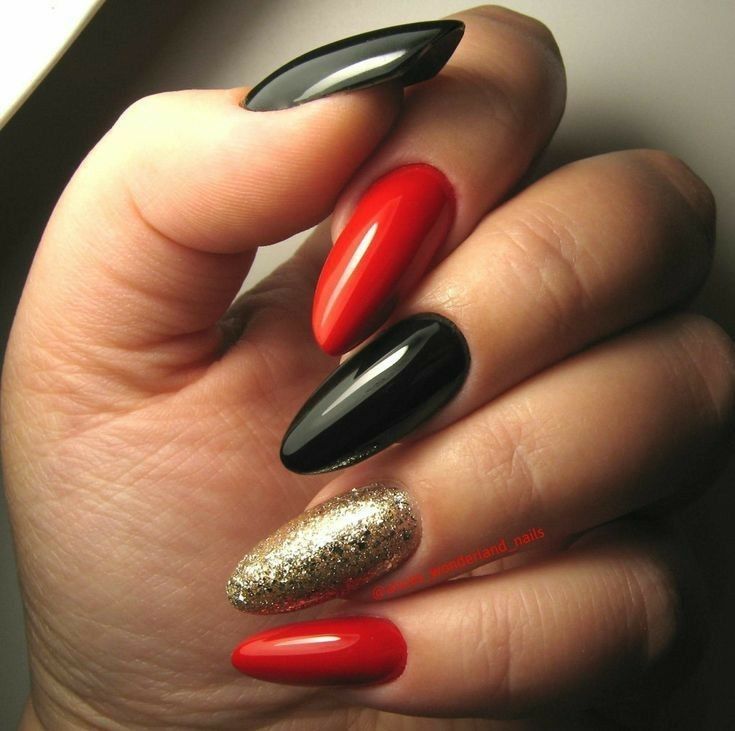
The linear polish accentuates the almond shape, creating a sleek, modern look that’s suitable for daytime.
It’s a graphic design that’s not too heavy, with just enough holiday charm to stand out.
Use Bio Sculpture Pillar Box Red for a creamy red base and thin striping brushes to create the plaid pattern.
Black gel paint and a gold liner, such as Orly GelFX Goddess, add a touch of glamour. Finish with a matte top coat, depending on your preference.
I start by mapping out the vertical and horizontal stripes, making sure the intersections are sharp.
Nail professionals recommend using a slightly dry striping brush for finer, more precise lines. Seal the design with two layers of top coat to create a durable finish.
This look is perfect for a winter wardrobe. It’s a traditional design with a modern twist, ensuring you’ll get plenty of compliments on how it was done.
Holiday Mix: Plaid and Snowflakes
A bold crimson almond shape, accented with a plaid pattern and gentle white snowflakes, captures the magic of the holiday season.
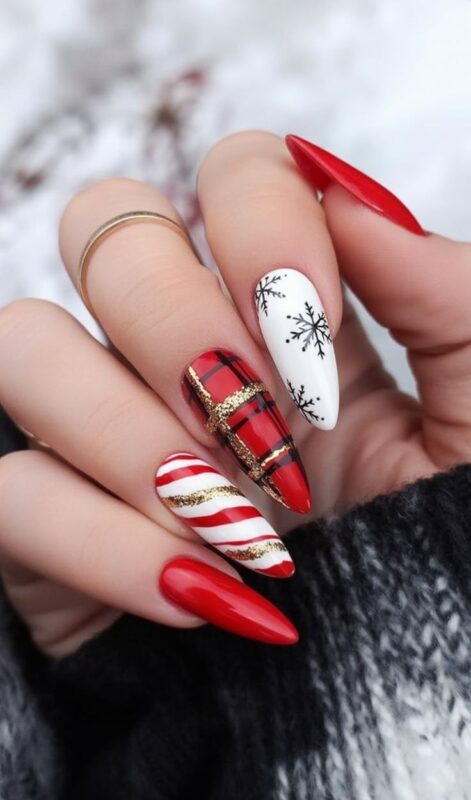
The combination of solid color and intricate patterns offers a mix of textures that is cohesive. This design does well for long-lasting holiday nails that still feel fun.
I recommend Apres Gel Couleur A-Red for the rich red base, along with black striping paint and white gel for the snowflakes.
Silver micro-glitter in the center of the snowflakes adds a hint of sparkle. Start by applying two coats of red, then use striping tape to create the plaid pattern.
For the snowflakes, use a dotting tool to form the petals and add a subtle sparkle with the glitter.
This design is a holiday favorite, combining the coziness of plaid with the delicate beauty of snowflakes. It’s good for December parties as it provides elegant touch that’s sure fantastic.
Winter Holly Minis on Soft Neutrals
Tiny holly leaves and delicate berries adorn soft off-white and creamy beige nails, giving a cozy, storybook vibe.
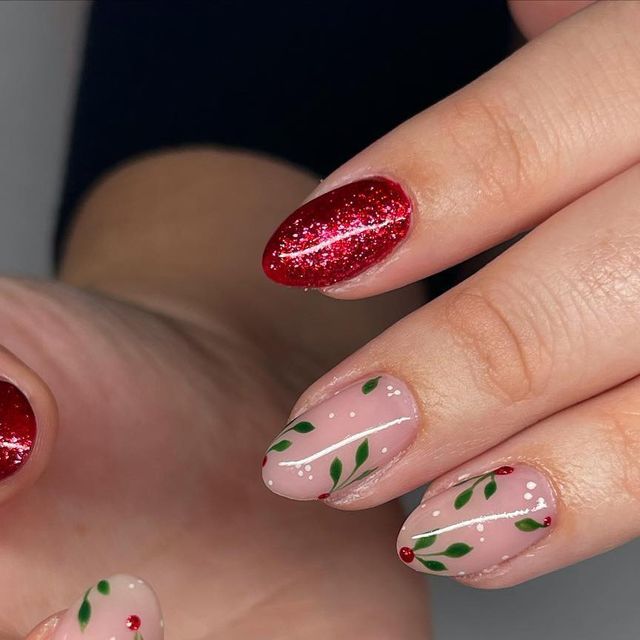
The design feels minimal with a refined look that’s best for shorter nails. The green accents provide just enough contrast to make the design pop without overwhelming the base color.
I choose Essie Marshmallow or OPI Funny Bunny for the off-white base, with olive and sage greens for the holly leaves.
The berries are created with a dotting tool. A glass top coat helps maintain the glossy finish, keeping the nails long-lasting.
To create the look, apply two thin coats of the base color, then add the olive branches.
Keep the lines clean and balanced for a soft, organic look. This is a great option for gift-giving runs or brunch with friends.
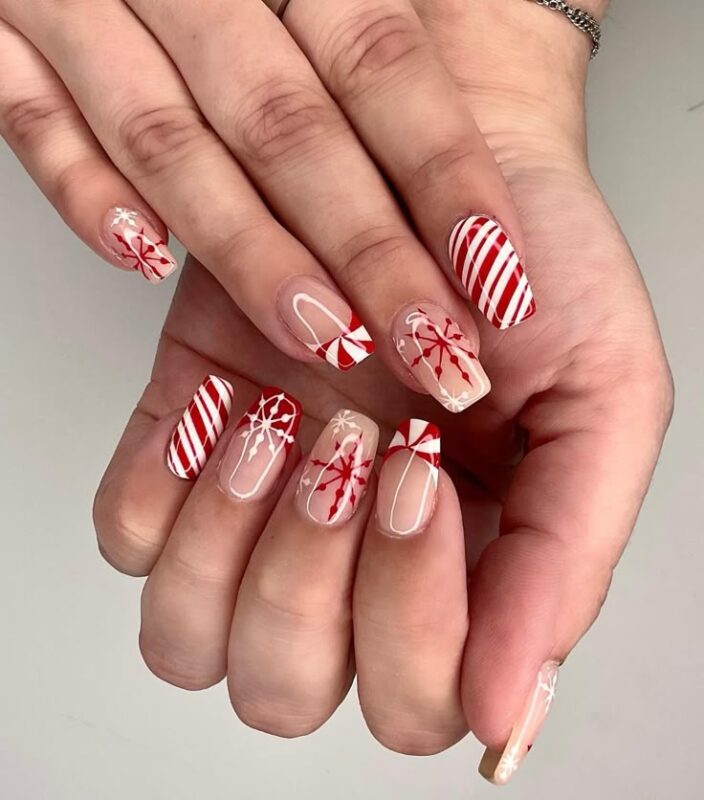
Gift-Wrap Starbursts with Micro Glitter
Rich, shiny red nails are accented with sharp red-and-white starbursts, with a sprinkle of silver glitter at the center.
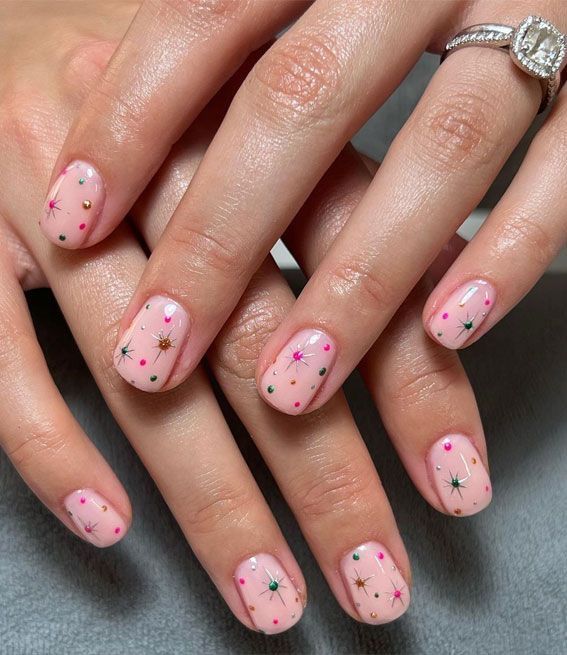
The design gives off a modern, festive vibe without being too literal, evoking the feel of wrapping paper. The starbursts are sharp, while the glitter adds a touch of sparkle.
For this look, I use OPI I’m Not Really A Waitress for the deep red base and a pure white gel paint for the stripes.
The glitter is from Zoya Cosmo, applied sparingly to create a delicate shimmer.
A long striping brush helps keep the lines neat, while a small brush is used for the center of the starbursts.
Start by painting the starbursts with thin lines, allowing them to cure before adding the glitter. Seal everything with a top coat for a glossy finish.
This design shines in cocktail parties, where you can pair it with bold jewelry and satin fabrics for a holiday-ready look.
Heritage Tartan with Red, Green, and Gold
This design features a bold tartan plaid pattern on almond nails, with rich red and green colors accented by gold lines.
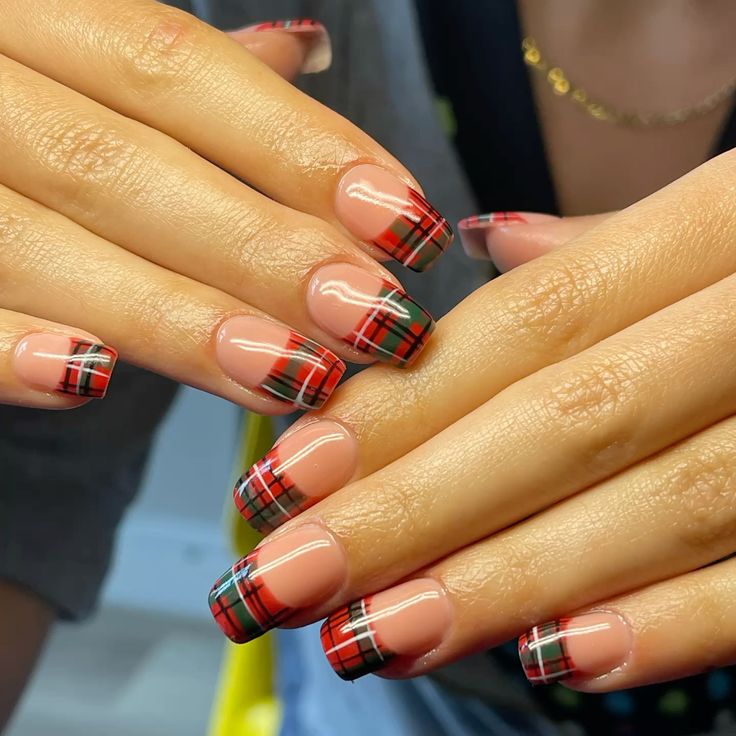
The smooth finish of the plaid design looks sleek if you love graphic nail art with a festive touch. The gold accents give it a luxurious feel.
I use DND Cherry for the red, OPI Stay Off the Lawn for the green, and a bright white gel for the plaid lines.
Metallic gold gel from Presto or Madam Glam adds the finishing touch. I apply striping tape to create clean lines, ensuring everything stays neat.
Start with a white base, then alternate between red, green, and gold stripes, curing between each color.
Artist Julie Kandalec’s tip to keep your hand steady on the table will help achieve sharp, precise lines.
Matte Buffalo Check on Chic Square Nails
Square nails are coated with a matte cherry red base, with buffalo-check accents in black. The design is contemporary, with sharp lines and a sleek finish so that you get a polished look.
The matte finish gives it a modern edge, while the black and red checks keep it festive.
For this design, I use Lights Lacquer Cherry Jelly for the red base and a sheer black gel for the buffalo check.
The grid is drawn using black gel, with a layer of matte top coat to finish. If you’re not comfortable with freehand designs, a silicone stamper can help with the buffalo check accents.
After applying two coats of red, add the matte top coat and create the black grid.
Once everything is set, tap the squares with sheer black to create the buffalo check. This design is ideal for stylish holiday look.