17 Easy Christmas Ornaments You’ll Have Fun DYIng
Disclosure: This post may contain affiliate links. As an Amazon Associate, I earn a small commission from qualifying purchases at no extra cost to you. Thanks.
Remember those little handmade decorations that made Christmas feel magical as a child?
You can create that same charm with a few simple craft supplies.
Homemade ornaments add personality to your tree without costing a fortune.
They are among the latest Christmas tree trends that create something special.
I like crafting ornaments as part of the DIY Christmas tree decorations at home.
In this article, I’ll share 17 creative DIY Christmas ornaments to try this season.
How To Make Christmas Ornaments at Home
1. Burlap Ribbon Bows
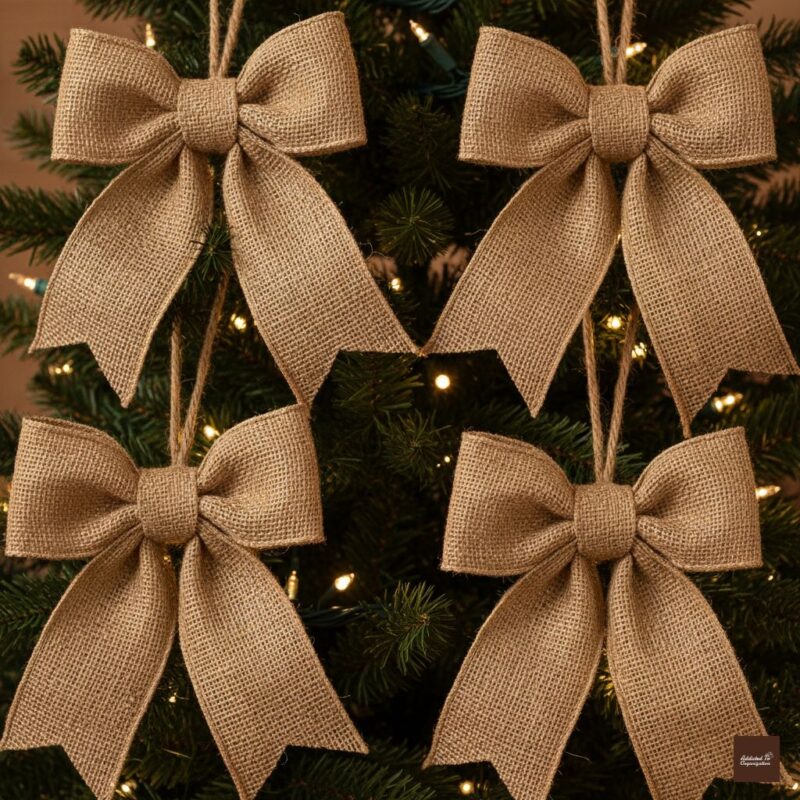
Burlap bows bring a sweet farmhouse touch to your Christmas tree if you love a little rustic charm in your holiday decor.
They’re simple to make, inexpensive, and easy to customize with different ribbon widths.
Tie them onto branches, wreaths, or garlands for a coordinated look throughout your home.
A few loose strands along the edges give each bow a relaxed, handmade finish.
Supplies: Burlap ribbon, scissors, hot glue gun, twine.
How to Make It
- Cut a length of burlap ribbon to your desired bow size.
- Fold the ribbon into two loops, overlapping the ends at the center.
- Pinch the middle tightly, then secure it with twine.
- Cut a short strip of burlap and wrap it around the center to hide the twine.
- Glue the strip at the back, then trim the ribbon ends into neat V-shapes.
- Tie a small piece of twine to the back for hanging your finished bow on the Christmas tree.
2. Mason Jar Lid Wreaths

Those spare Mason jar lids in your kitchen drawer deserve a spot on the Christmas tree.
Turn them into mini wreath ornaments with a little greenery, red berries, and hot glue.
The circular shape gives each ornament a classic wreath look, while the festive accents bring in traditional Christmas colors.
These little decorations suit farmhouse trees, rustic themes, or a tree filled with handmade touches.
Supplies: Mason jar lid rings, faux Christmas greenery, artificial red berries, hot glue gun, ribbon
How to Make It
- Clean and dry the Mason jar lid rings.
- Trim small pieces of faux greenery to fit around each ring.
- Attach the greenery with hot glue, covering the ring evenly.
- Glue a few red berries onto the greenery for a festive accent.
- Tie a small ribbon into a bow and attach it to the wreath.
- Add a loop of twine or ribbon at the top for hanging.
3. Orange and Clove Pomander Ornament
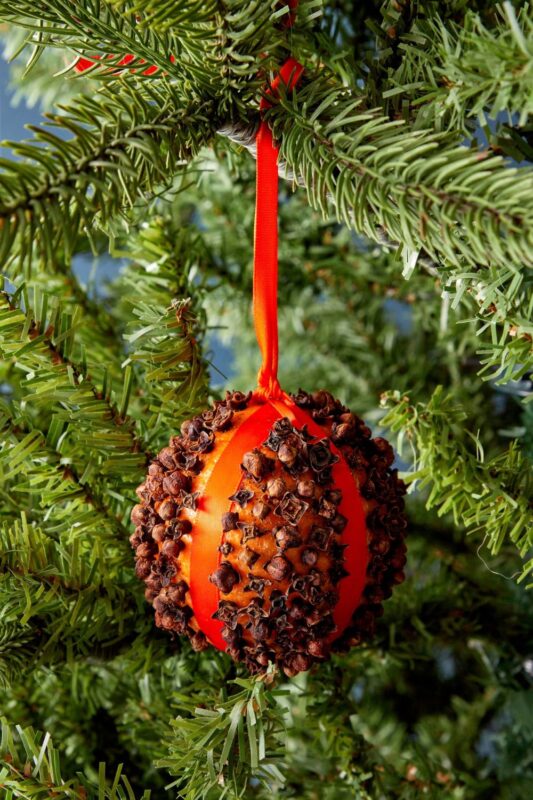
These old-fashioned ornaments bring a lovely, spicy scent to Christmas decorating.
Fresh orange peels dotted with cloves create a charming natural decoration that looks right at home on a traditional tree.
The combination of citrus and warm spice gives your holiday home a little nostalgic charm, too.
Choose small oranges for dainty ornaments, then arrange the cloves into simple patterns for extra detail.
Supplies: Small oranges, whole cloves, orange peeler, natural twine.
How to Make It
- Wash and dry the orange, then use a skewer to make small holes in the peel.
- Push whole cloves into the holes to create stars, stripes, or a scattered pattern.
- Tie twine around the orange to create a hanging loop.
- Let the pomander dry in a cool, well-ventilated spot before hanging it.
4. Half-Eaten Gingerbread Cookie Ornaments

Gingerbread men with tiny bites missing bring a playful twist to the Christmas tree.
These cheeky little ornaments look like real holiday cookies, complete with white icing details and pretend bite marks.
Use lightweight air-dry clay for a reusable decoration that won’t attract hungry little hands.
The finished ornaments look adorable on a kitchen Christmas tree or tucked among traditional red and gold baubles.
Supplies: Air-dry clay, gingerbread man cookie cutter, acrylic paint, white paint pen, craft ribbon, craft knife.
How to Make It
- Roll out the clay to an even thickness, then cut out gingerbread men using the cookie cutter.
- Use the craft knife to remove a small curved section from an arm or head to create the bitten effect.
- Make a small hole near the top for hanging before leaving the clay to dry according to the package instructions.
- Paint the dried figures brown, then add white icing lines, buttons, and tiny facial details.
- Thread ribbon through the hole once the paint has dried, then hang your quirky cookie ornaments on the tree.
5. DIY Personalized Glitter Ornament
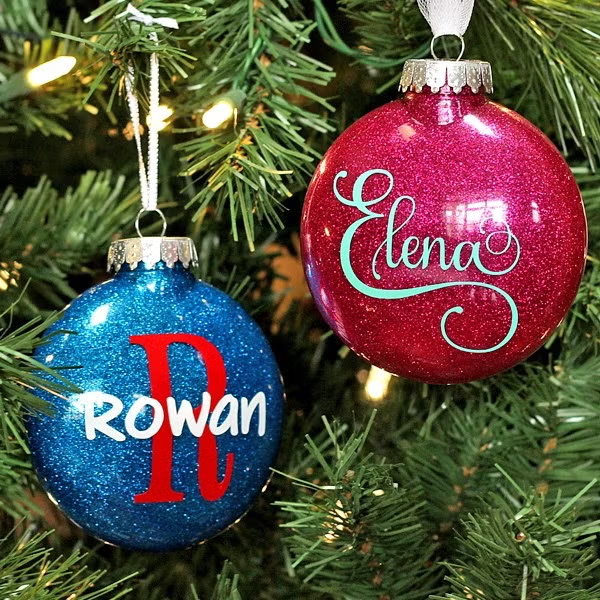
Give your Christmas tree a personal touch with glittery ornaments featuring names, initials, or a special year.
These little keepsakes look lovely on your own tree, but they also make thoughtful handmade gifts for family and friends.
Choose clear baubles so the glitter catches the light from every angle.
Add a name or short message to create a decoration that feels a little more meaningful than an ordinary store-bought ornament.
Supplies: fillable plastic ornaments, craft glitter, glue, vinyl letter stickers, thin satin ribbon.
How to Make It
- Remove the ornament cap and apply a thin layer of ornament glue inside the clear bauble.
- Pour in glitter, rotate the ornament to coat the interior, then shake out the excess.
- Allow the glue to dry fully before replacing the cap.
- Add a name, initial, or year using vinyl letters on the outside.
- Tie a satin ribbon through the top for a finished look.
6. Wood Slice Ornaments
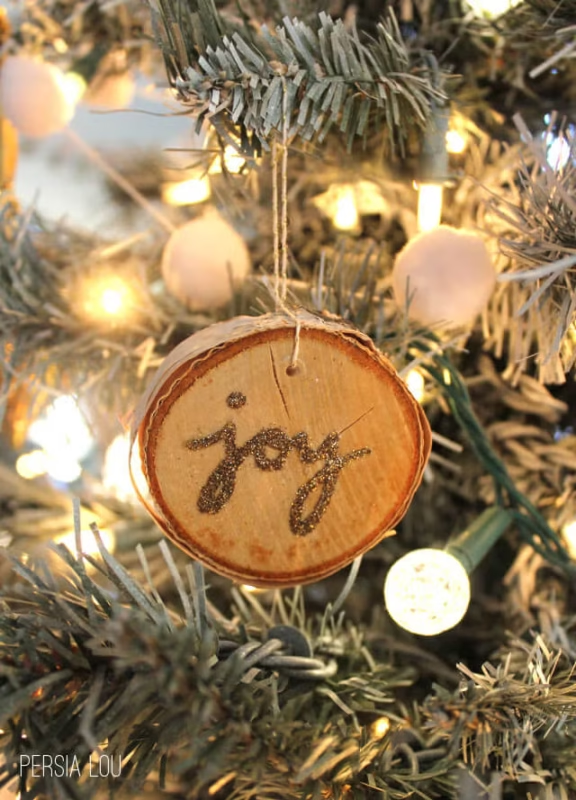
Natural wood slices bring a cozy woodland touch to your Christmas tree.
Their rustic grain gives every ornament its own character, so even simple designs look charming.
Paint tiny Christmas scenes, add initials, or leave the wood plain for a more understated style.
These decorations suit farmhouse trees, Scandinavian-inspired spaces, and holiday displays filled with natural materials.
Supplies: wood slices with holes, acrylic craft paint, paint pens, jute twine, craft sealer.
How to Make It
- Wipe the wood slices clean and check that the edges are smooth.
- Paint a small design on each slice, such as a snowflake, evergreen tree, or star.
- Use fine-tip paint pens to add names, dates, or delicate details.
- Let the paint dry, then apply a suitable clear sealer if desired.
- Thread jute twine through the hole and tie a loop for hanging.
7. Gnome Ornament

Tiny Christmas gnomes bring a playful, handmade touch to your holiday tree.
Their floppy hats and fluffy beards give them plenty of character, even when you keep the design simple.
Choose traditional red felt for a festive look, or go with neutral colors for a woodland-inspired ornament.
These little fellows look lovely tucked between branches or tied onto a wrapped gift as an extra surprise.
Supplies: Wood beads, wooden craft pieces, craft felt, faux fur, hot glue gun.
How to Make It
- Cut felt into a triangle, then roll it into a cone to form the gnome’s hat.
- Glue the edges together and trim the bottom neatly.
- Attach a small piece of faux fur beneath the hat to create the beard.
- Glue a wooden bead or pom-pom just below the hat for the nose.
- Let the glue dry before hanging your gnome on the tree.
8. Dried Orange Fox Ornaments

Dried orange slices bring a lovely old-fashioned charm to Christmas decorating, with their warm color and delicate, sunburst-like centers.
Turn them into little fox ornaments for a woodland-inspired tree that feels a little different from the usual holiday decorations.
A few simple details transform each slice into a cute forest character.
Supplies: Dried orange slices, orange and white felt, black craft paint pen, craft glue, jute twine.
How to Make It
- Cut small fox ears from orange felt, adding white felt tips for contrast.
- Glue the ears to the top edge of a dried orange slice.
- Draw two tiny eyes and a nose near the center using a black paint pen.
- Attach a short loop of twine to the back for hanging.
9. Egg Carton Jingle Bell Ornaments

An empty egg carton might seem destined for the recycling bin, but its little cups make surprisingly charming Christmas bells.
This is a lovely budget-friendly craft for a family decorating afternoon, with plenty of room for creative painting.
Choose classic red and green, or paint the bells gold for a more traditional holiday finish.
Supplies: Cardboard egg cartons, acrylic craft paint, jingle bells, ribbon, craft glue.
How to Make It
- Cut individual cups from the egg carton, trimming the edges into a bell shape.
- Paint each cup in your chosen Christmas colors, then leave it to dry.
- Make a small hole in the top of each cup.
- Thread ribbon through the hole, securing a small jingle bell inside if desired.
- Tie a loop at the top for hanging.
10. Block Letter Twine Ornaments

Personalized Christmas decorations don’t have to be complicated to stand out.
Block letter ornaments let you display family initials, spell out a festive word, or create a small keepsake for someone special.
Wrapping the letters in twine gives them a rustic finish that suits farmhouse and natural Christmas themes.
Supplies: Wooden block letters, natural jute twine, hot glue gun, thin ribbon.
How to Make It
- Choose a wooden letter with a shape that’s easy to wrap.
- Secure the end of the twine to the back with a small dab of hot glue.
- Wrap the twine tightly around the letter, adjusting it around corners and curves.
- Glue down the final end and trim away any excess.
- Attach a ribbon loop to the back so the letter hangs from a branch.
11. Yarn Stars

Soft yarn stars bring a cozy handmade touch to your Christmas tree when you want a break from shiny baubles.
Choose cream yarn for a simple Scandinavian look, or use red, green, or gold for a more festive display.
These lightweight ornaments are easy to customize, so each star can have its own color and texture.
Supplies: Craft yarn, wooden star shapes, craft glue, twine.
How to Make It
- Apply a small amount of glue to the back of a wooden star.
- Secure the yarn end, then wrap the yarn around the star until the surface is covered.
- Guide the yarn around each point carefully, filling any gaps as you go.
- Trim the yarn and glue the end securely at the back.
- Add a small twine loop for hanging once the glue has dried.
12. Clothespin Ornament
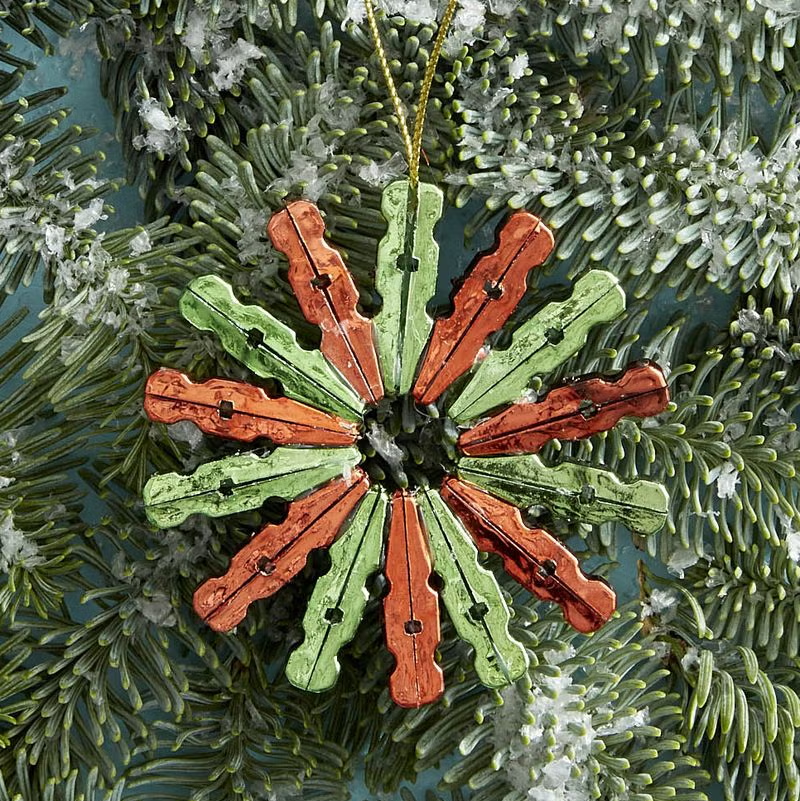
Wooden clothespins have a crafty little secret: they make charming Christmas ornaments with just a few simple changes.
Their natural wood finish suits rustic trees, while a coat of paint gives them a brighter holiday look.
This is a fun project for using up spare craft supplies, and the finished decorations add a homemade touch to your branches.
Supplies: Wooden clothespins, acrylic craft paint, hot glue gun, jute twine.
How to Make It
- Take apart several wooden clothespins by removing their metal springs.
- Arrange the wooden pieces into a star or snowflake shape.
- Glue the pieces together at the center, then leave the ornament to dry.
- Paint the finished shape white, red, or gold, or keep the wood natural.
- Attach a twine loop to the back for hanging.
13. Pinecone Reindeer

A pinecone makes an adorable little reindeer, complete with a bright red nose and a pair of playful eyes.
This woodland-inspired ornament is a lovely way to bring natural textures into your Christmas decorating.
Choose a pinecone with an open shape so the facial details stand out clearly.
Supplies: Pinecones, googly eyes, red pom-poms, brown pipe cleaners, craft glue.
How to Make It
- Choose a clean, dry pinecone and position it so one end serves as the reindeer’s face.
- Glue two googly eyes near the front.
- Attach a red pom-pom beneath the eyes for Rudolph’s nose.
- Bend two short pieces of pipe cleaner into antlers, then secure them near the top.
- Tie a ribbon loop around a sturdy part of the pinecone for hanging.
14. Clay Star Ornaments

Simple star ornaments have a timeless place on the Christmas tree, and handmade clay versions add a personal touch.
Air-dry clay keeps the project straightforward, with no oven required for curing.
Leave the stars plain for a natural finish, or paint them once they’re completely dry.
Supplies: Air-dry clay, star-shaped cookie cutters, string, small rolling pin.
How to Make It
- Knead the clay until soft, then roll it out to an even thickness.
- Cut out stars using the cookie cutter.
- Make a small hole near the top of each star using a skewer.
- Leave the stars to dry according to the clay package instructions, turning them as directed.
- Thread string through each hole once the clay is fully dry.
15. Wooden Marbled Ornaments

Marbled ornaments bring a modern, artistic touch to your Christmas tree, with swirls that make every piece look a little different.
Wooden blanks provide a simple surface for experimenting with soft neutrals, festive reds, or metallic shades.
The finished decorations look lovely on contemporary trees or mixed in with traditional baubles.
Supplies: Wooden ornament blanks, acrylic craft paint, small disposable cups, ornament hanging cord.
How to Make It
- Protect your work surface and place each wooden ornament blank on a disposable surface.
- Pour small amounts of two or three paint colors into separate cups.
- Drizzle the colors onto the wood, then gently tilt the ornament to create swirling patterns.
- Leave the ornament flat until the paint is completely dry.
- Thread hanging cord through the hole to finish.
16. Wrapped Peppermint Candy Ornaments
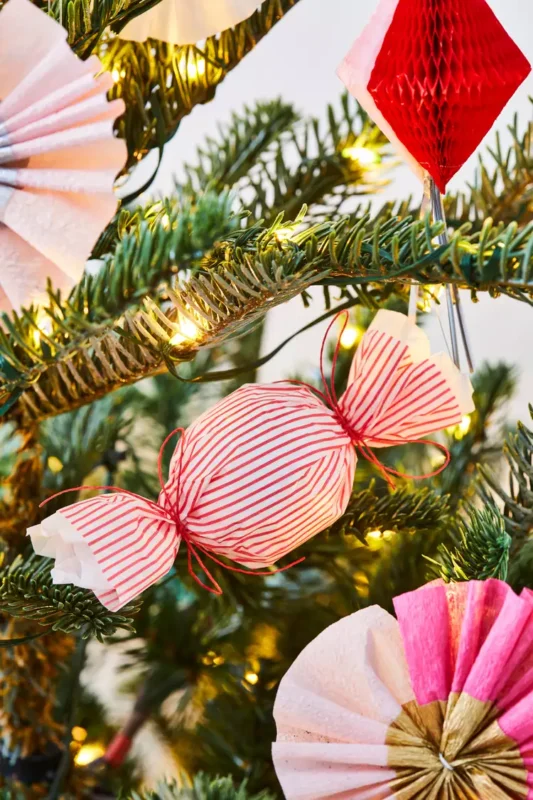
Peppermint candies are a Christmas classic, and their red-and-white stripes make a cheerful theme for homemade tree decorations.
These ornaments recreate the look of wrapped sweets without the risk of sticky candy melting on your branches.
Use lightweight craft materials to create oversized peppermint shapes that stand out among your other decorations.
Supplies: White craft foam sheets, red satin ribbon, clear cellophane wrap, craft glue
How to Make It
- Cut two matching circles from white craft foam.
- Glue red ribbon across the front in diagonal stripes to mimic peppermint swirls.
- Attach the second foam circle to the back for a neater finish.
- Wrap the ornament loosely in clear cellophane, twisting the ends like a candy wrapper.
17. Beaded Star Ornaments

A little sparkle goes a long way with beaded star ornaments.
These delicate decorations catch the Christmas lights and add a polished detail to your tree without taking up much space.
Choose gold beads for a classic festive look, silver for a wintry theme, or wooden beads for a more natural style.
Supplies: Craft beads, flexible craft wire, wire cutters.
How to Make It
- Cut a length of craft wire and bend it into a five-point star shape.
- Thread beads onto the wire, leaving enough space to bend the corners neatly.
- Twist the wire ends together securely, then trim any sharp excess.
- Adjust the points until the star looks even.
Final Thoughts
Handmade Christmas ornaments add a little more heart to your holiday decorating.
Each piece holds a memory, a creative moment, or a special tradition shared with loved ones.
Years from now, the ornaments you treasure most may not be the fanciest ones, but the little handmade pieces that remind you of Christmases gone by.