
13 Creative DIY Christmas Tree Toppers That Are Merry And Bright
Disclosure: This post may contain affiliate links. As an Amazon Associate, I earn a small commission from qualifying purchases at no extra cost to you. Thanks.
Decorating my Christmas tree is one of my favorite parts of getting ready for the holidays.
I usually make amazing Christmas ornaments and beautiful ribbons.
However choosing the perfect topper has never been easy.
I’ve tried different styles over the years, yet the top of the tree always seems to need something extra.
A traditional star is lovely, but sometimes I want a decoration that feels a little more personal.
That’s what inspired me to search out creative DIY Christmas tree toppers that bring something special to holiday decorating.
In this article, we’ll go over 13 DIY Christmas tree topper ideas that gives your tree a fresh finishing touch.
I found some really beautiful Christmas tree toppers worth buying on Amazon:
How To Make Christmas Tree Toppers (Home Projects)
1. Gold Moravian Star

A gold Moravian star makes a striking Christmas tree topper if you enjoy a little sparkle in your holiday decorating.
Choose champagne gold with bronze accents for a warm metallic finish that stands out against green branches.
The pointed shape gives the star an intricate look, so it is special than a basic store-bought topper.
You can craft one from cardstock, decorate it to match your Christmas theme, and adjust the size to suit your tree.
Supplies List
- 10 sheets of 8.5″ × 11″ ( I used silver glitter cardstock)
- Champagne gold craft paint
- Bronze craft paint
- Decorative paper (optional)
- Glue stick
- Hot glue gun
- Craft scissors
- Ruler
How to Make It
- Draw and cut out the star sections using your ruler and cardstock, keeping the pieces consistent in size.
- Fold the sections along the marked lines to form the pointed shapes that give a Moravian star its distinctive appearance.
- Apply champagne gold paint to the main surfaces, then add bronze accents for extra dimension if desired.
- Use the glue stick to attach any decorative paper, then assemble the sections carefully with hot glue.
- Join the remaining pieces to complete the three-dimensional star, then secure a sturdy hanging or mounting point so it sits firmly on top of your tree.
Pro Tip: Make a small paper template first to check the star’s proportions before cutting all your cardstock.
2. Farmhouse Tree Topper
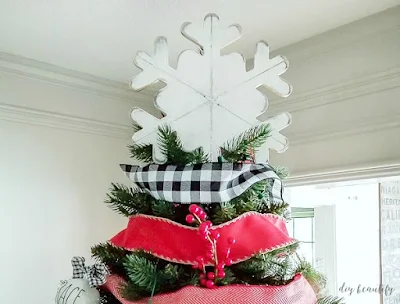
A wooden snowflake is a lovely starting point for a farmhouse Christmas tree topper, especially if you prefer rustic decorations over glittery ones.
Use dark gray chalk paint as the base, then brush on white accents to give the wood a weathered, vintage appearance.
The mix of muted colors suits a tree decorated with burlap ribbons, wooden ornaments, and warm white lights.
This project is a good way to give a simple wooden cutout a fresh holiday purpose.
Essential Supplies
- Wood snowflake (about 8 inches wide)
- Dark gray chalk paint
- Paint brush
- White chalk paint
- Clear finishing wax
- Finish sander
- Drill
- Long white twist tie
How to Make It
- Lightly sand the wooden snowflake to smooth rough edges and prepare the surface for painting.
- Apply dark gray chalk paint across the snowflake, covering the front and edges, then let it dry completely.
- Brush a small amount of white chalk paint over the raised details and edges to create a distressed farmhouse finish.
- Once the paint has dried, apply clear wax according to the product instructions to protect the finish.
- Drill a small hole near the top or use a suitable attachment point, then secure the long white twist tie to fasten the topper to your tree.
Quick Win: Keep the white paint concentrated on the raised edges so the dark gray base remains visible and gives the snowflake a naturally aged look.
3. Bandana Tree Topper

A bandana tree topper brings a relaxed country look to Christmas decorating, with plenty of room for color and personality.
Keep the fabric loose enough to show its pattern, then arrange the folds into a full bow or a soft, gathered accent at the top of the tree.
Red bandanas suit traditional holiday colors, but black-and-white prints give the decoration a farmhouse twist.
This is a handy option for anyone who wants a fabric topper that stands out from the usual star or angel.
Supplies List
How to Make It
- Fold the bandana into a wide strip, keeping the printed side visible.
- Gather the center of the fabric to form a bow, adjusting the loops until they look full.
- Wrap floral wire around the gathered center to hold the shape securely.
- Add pipe cleaners or ribbon to create tails that drape over the upper branches.
- Attach the bow to the top branch with floral wire, then arrange the fabric until the topper sits neatly.
Styling Tip: Choose a bandana that repeats one of the colors already used on your tree for a coordinated country-style finish.
4. 3D Paper Star Tree Topper
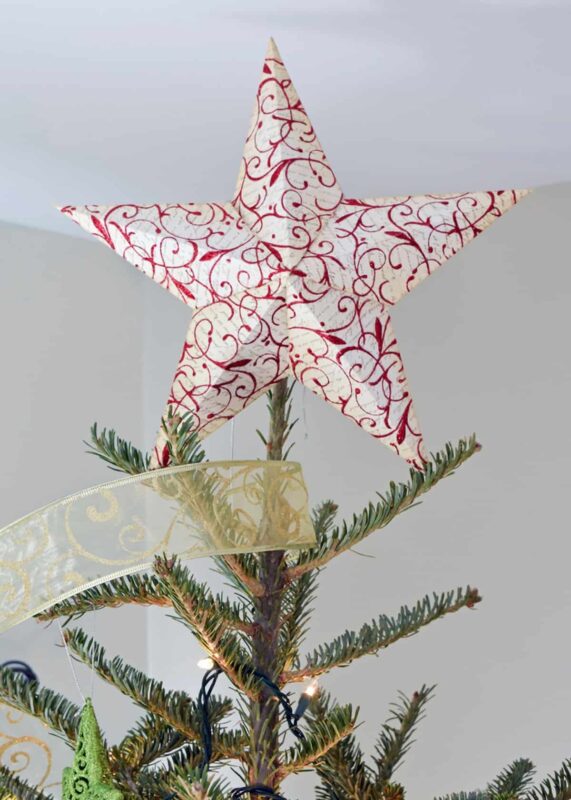
A three-dimensional paper star gives the tree a striking focal point, yet the materials are simple enough for a weekend craft session.
Heavy cardstock holds the pointed shape better than ordinary paper, and tissue paper adds a delicate layer if you want a softer finish.
Let the design be clean with metallic spray paint or a light coat of Mod Podge for a little extra shine.
The finished star suits minimalist trees, colorful family trees, and handmade holiday displays.
Materials Needed
- Heavyweight cardstock
- Pencil
- Scissors
- Ruler
- String
- Tissue paper
- Metallic spray paint or Mod Podge
- Hole punch
- Dry adhesive strips
- Fabric or paper stiffener (optional)
How to Make It
- Draw a star template on cardstock, including matching sections that will fold into a dimensional shape.
- Cut out the pieces carefully, then score the fold lines with a ruler and the blunt edge of a tool.
- Fold along the scored lines to form the star’s points and central ridges.
- Join the sections using dry adhesive strips or glue dots. Avoid wet glue because it may warp the cardstock.
- Decorate the star with tissue paper, spray paint, or Mod Podge, then let everything dry fully.
- Punch a hole at the base, thread string through it, and secure the finished topper to the tree.
Pro Tip: Test the folds on scrap paper before cutting your final cardstock so the points line up neatly.
5. Pom-Pom DIY Tree Topper

A pom-pom tree topper brings a playful burst of texture to your Christmas tree, and it’s a fun project for using yarn in colors that match your decorations.
A foam sphere provides the base, so the finished topper has a rounded shape covered in fluffy pom-poms.
Choose classic red, green, and white for a traditional look, or mix in pink, mustard, and cream for a more cheerful palette.
The best part is that you control the size and color combination to suit your tree.
Required Items
How to Make It
- Select a foam sphere sized to suit your tree, then mark a small opening at the base for mounting.
- Carefully drill a hole into the base, using a drill bit wide enough to accommodate the top branch or a suitable support.
- Arrange the pom-poms by color before gluing so the pattern looks intentional.
- Attach the pom-poms around the sphere with hot glue, pressing each one gently into place and covering the surface.
- Leave the glue to set, then fit the topper onto the tree using the prepared opening.
Fun Fact: Place the larger pom-poms first and fill the gaps with smaller ones for fuller coverage.
6. DIY Vintage Angel Tree Topper
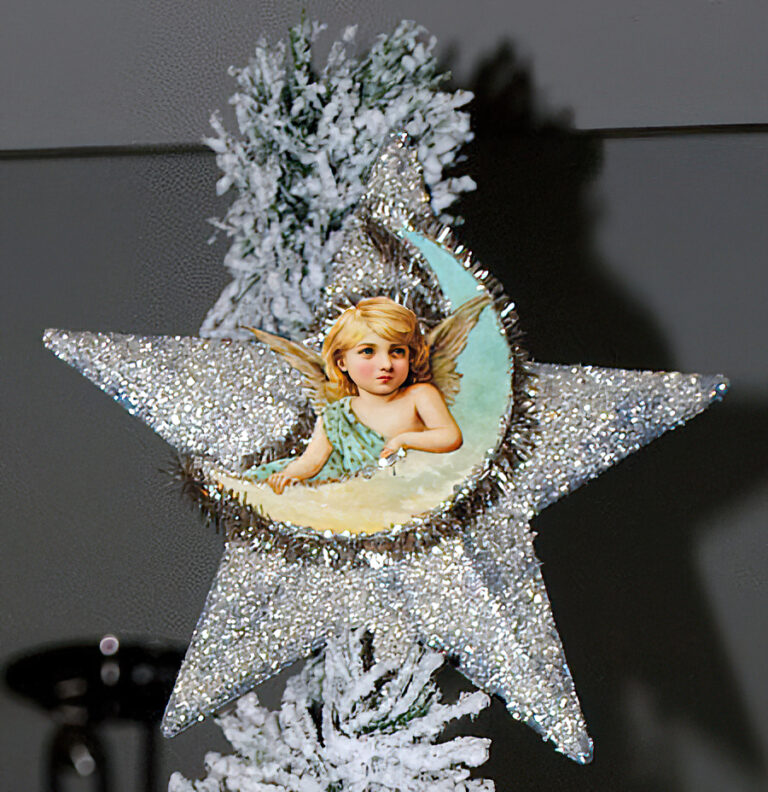
A vintage angel brings an old-fashioned Christmas charm to the top of the tree, with silver glitter giving the decoration a nostalgic finish.
White cardstock forms the base, so you can shape the angel’s wings and gown to suit your preferred design.
German glass glitter adds a lovely sparkle, and silver tinsel trim gives the edges a festive finish.
This handmade topper suits traditional Christmas trees decorated with silver ornaments, heirloom pieces, and soft white lights.
Supplies List
How to Make It
- Draw an angel template with a gown, wings, and a small head, then cut the shape from white cardstock.
- Fold or layer the cardstock to give the angel more dimension, securing the sections with school glue gel.
- Apply glue to selected areas of the wings and gown, then sprinkle German glass glitter over the surface.
- Attach silver tinsel trim around the wings and gown using the hot glue gun.
- Allow the decoration to dry completely, then secure it to a lightweight support that fits over the top branch.
Best Tip: Apply the glitter over a tray or sheet of paper so you can collect the excess and reuse it.
7. Oversized Tree Topper Bow

An oversized bow gives a Christmas tree a dramatic finishing touch, and the ribbon does most of the decorating for you.
For this style, I preferred a wider ribbon for the main loops, with a narrower ribbon adding another layer of detail.
Choose wired ribbon if you want the loops to hold their shape and the tails to drape neatly over the branches.
A traditional red bow looks festive, but champagne ribbon is best for many other Christmas themes.
Supplies
How to Make It
- Cut a generous length of the wider ribbon, leaving extra material for the bow loops and hanging tails.
- Fold the ribbon back and forth into large loops, keeping them similar in size on either side.
- Pinch the center together and fasten it tightly with a zip tie.
- Use the narrower ribbon to form smaller loops or wrap the center to conceal the fastening.
- Attach the pipe cleaners at the back, then use them to secure the bow to the top branch.
- Trim the tails diagonally and fluff each loop until the bow looks full and even.
Styling Tip: Let the ribbon tails cascade down the upper branches for a dramatic look that carries the bow into the rest of the tree.
8. Candy Cane Star Tree Topper
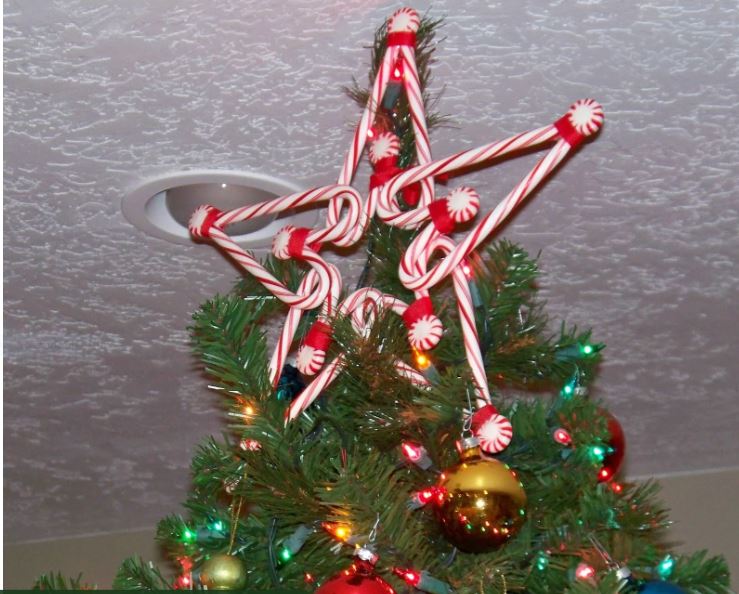
This candy cane star is a playful alternative to traditional tree toppers, combining familiar Christmas sweets into a festive star shape.
Red-and-white candy canes form the outline, while mints fill the gaps and add another decorative detail.
The design suits candy-themed trees, colorful family rooms, or holiday decorating with children.
Since the materials are lightweight, arrange the pieces on a flat surface first to check the star shape before attaching everything together.
Supplies Required
How to Make It
- Arrange the candy canes into a star pattern, positioning their curved ends to form the points.
- Use small dots of hot glue to join the candy canes where they meet, taking care not to crack them.
- Glue the wrapped mints into the open spaces to complete the design.
- Tie a ribbon around a sturdy junction at the back to create a hanging loop.
- Let the glue set completely, then attach the star to the top of the tree.
Quick Tip: Keep the mints wrapped and use the glue on the wrappers, not directly on the sweets, for a cleaner decorative finish.
9. DIY Dollar Store Tree Topper
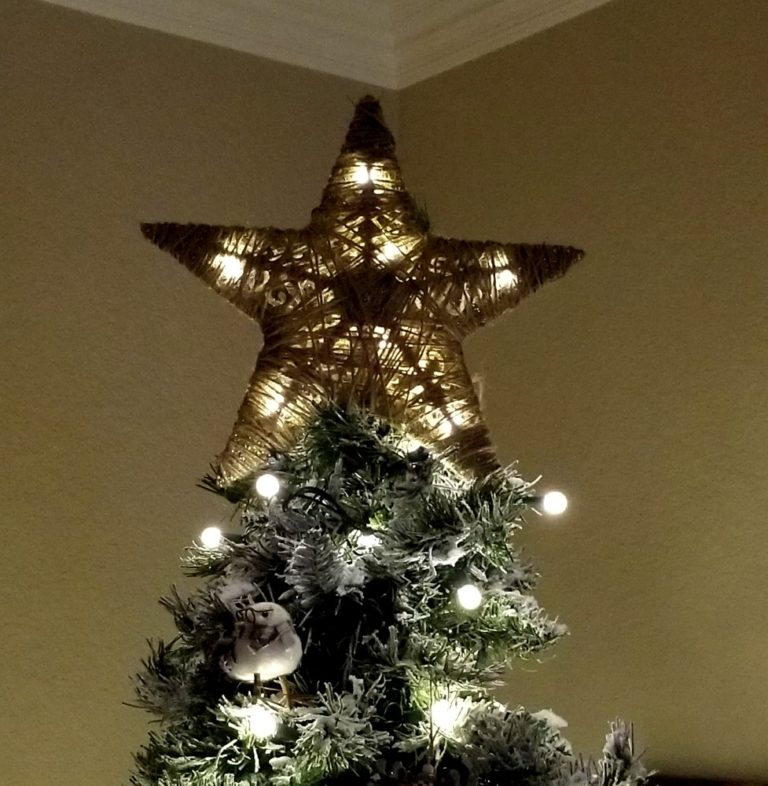
A dollar store star is an easy starting point for a Christmas tree topper that looks more expensive than its price tag.
I’ve always appreciated decorations that need only a few extra touches to stand out, and this idea keeps the crafting simple.
Jute twine brings a rustic detail to the glittery star, while small LED lights give it extra sparkle after dark.
It’s a budget-friendly project for refreshing an older topper.
Material List
How to Make It
- Check that the glittered star is large enough to stand out above your tree.
- Wrap a little jute twine around the star’s base or mounting point, securing the ends neatly.
- Wind the LED lights around the star, distributing them evenly so the light reaches across the design.
- Fasten the topper to the upper branch using the original attachment or extra twine.
- Switch on the lights and adjust the star until it sits upright and faces forward.
Budget Boost: Pick a star from a dollar store or discount shop, then spend your budget on the lighting for a custom finish.
10. Beaded Star Tree Topper
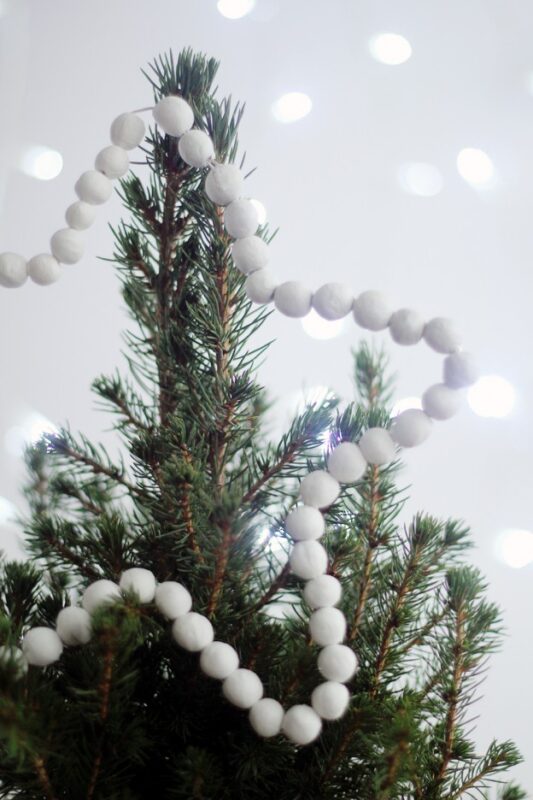
A beaded star gives your tree a handmade accent with a little extra texture and sparkle.
Air-dry clay forms the beads, while thin wire holds the star shape together.
I recommend choosing beads in a limited color palette, such as gold so the finished design stands out against the tree’s branches.
This project takes a little patience when shaping and assembling the pieces, but the result is a distinctive topper you can bring out every Christmas.
Materials
How to Make It
- Roll small, evenly sized beads from the air-dry clay, then pierce each one carefully so the wire can pass through.
- Leave the beads to dry according to the clay manufacturer’s instructions.
- Cut the wire into sections and bend it into a five-pointed star outline using the pliers.
- Thread the dried beads onto the wire, arranging the colors and spacing to suit your design.
- Twist the wire ends together securely and form a small loop or stem at the base for attaching the star to the tree.
Design Secret: Test your bead arrangement on the wire before tightening the star, since small spacing changes make a noticeable difference to the finished shape.
11. DIY Snowflake Tree Topper
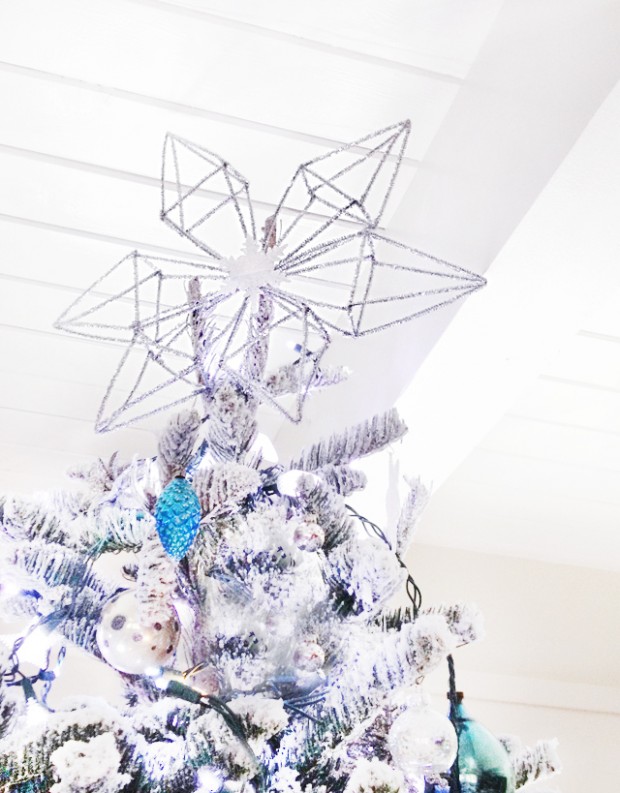
Metallic pipe cleaners are surprisingly useful for creating a snowflake tree topper with plenty of shine and a frosty look.
Silver gives the design a classic winter appearance.
The wire inside each pipe cleaner makes it easy to bend the strands into symmetrical branches.
This craft is ideal for a last-minute topper because it requires only a few materials.
It leaves plenty of room for experimenting with the snowflake’s shape.
What You’ll Need
How to Make It
- Cut several lengths of metallic pipe cleaner to form the main arms of the snowflake.
- Cross three pieces at their centers to create six evenly spaced branches, then secure the intersection with craft wire.
- Bend smaller pipe-cleaner sections into loops, V-shapes, or pointed branches along each arm.
- Repeat the details around the snowflake, keeping the design as symmetrical as possible.
- Use extra craft wire to form a mounting loop at the back, then attach the topper securely to the tree.
Finishing Touch: Twist the ends of the pipe cleaners into tiny curls or points to give each snowflake branch a more intricate finish.
12. Starburst Tree Topper

A starburst tree topper gives your Christmas tree a dramatic finishing touch with long wooden rays radiating from a central sphere.
I used gold spray paint for a metallic finish that catches the light against green branches.
Wooden skewers keep the design lightweight, while the Styrofoam ball holds the rays in place.
The result resembles a sunburst ornament with a vintage-inspired look.
This project suits a tree that needs a bold focal point without spending money on an expensive store-bought topper.
Things Needed
- Wooden skewers (2 bags)
- 5-inch Styrofoam ball
- PVC pipe (about 3 inches long)
- Gold spray paint
- Hot glue gun
How to Make It
- Mark evenly spaced points around the Styrofoam ball to guide the placement of the wooden skewers.
- Push the skewers into the ball, spreading them in different directions to form a full starburst.
- Apply hot glue at the entry points to keep the skewers secure.
- Insert the PVC pipe into the bottom of the ball to form a sleeve for the tree’s top branch.
- Spray the entire structure with gold paint in a well-ventilated area, following the paint label’s instructions.
- Let the paint dry completely before fitting the topper onto the tree.
Creative Trick: Cut a few skewers slightly shorter near the center to give the starburst a more layered appearance.
13. Paper Fan Topper

A paper fan tree topper brings a cheerful, handmade touch to Christmas decorating.
Folded paper forms a wide fan that stands out above the branches, giving the tree a festive focal point.
I choose metallic gold paper for a polished finish that catches the glow of nearby Christmas lights.
The fan’s size is easy to adjust, so you can make a smaller topper for a slim tree or a larger version for a fuller one.
Supplies List
How to Make It
- Cut two equal rectangles from the cardstock, sized according to how wide you want the fan to be.
- Fold each rectangle back and forth in even accordion pleats.
- Fold each pleated strip in half, then secure the inner edges with glue dots to form two fan sections.
- Join the sections to create one wide semicircle, pressing the connection firmly into place.
- Attach the wooden dowel to the back as a support, then tie ribbon around the base for a neat finish.
- Position the fan at the top of your tree, securing the support between the upper branches.
Paper-Craft Hack: Score the fold lines with a ruler before folding to keep the pleats crisp and evenly spaced.
Wrapping up
Little details often make Christmas decorating more special, and the tree topper is no exception.
Creating my own has given me a chance to try something different and put a personal stamp on my holiday decorations.
There’s something special about stepping back to admire a Christmas tree topped with something you made yourself.
That little piece of creativity becomes part of your family’s Christmas story, year after year.