15 Thanksgiving Decorations Ideas For Classrooms


Disclosure: This post may contain affiliate links. As an Amazon Associate, I earn a small commission from qualifying purchases at no extra cost to you. Thanks.
I enjoy seeing a classroom take on a festive look as Thanksgiving approaches.
A cheerful classroom helps students get excited about the holiday and brings new energy into the learning space.
I especially enjoy seeing students’ artwork become part of the decorations because it gives them a sense of pride.
For me, the best designs bring holiday cheer into the room without distracting from learning.
I’ve prepared 15 Thanksgiving classroom decoration ideas to inspire a festive space your students will love.
How To Decorate A School Classroom For Thanksgiving
1. Hanging Fall Leaf Garland

A hanging fall leaf garland brings the warm colors of autumn into your classroom with very little effort.
The leaves add color to empty walls, windows, or the space above a classroom bulletin board.
This decoration looks lovely in traditional fall shades like orange, red, yellow, and brown.
Students can help create the garland, giving them a chance to contribute to the classroom’s seasonal look.
Hang it across the room for a cheerful autumn display that welcomes everyone who walks through the door.
Materials You Need
- Artificial fall leaves or colored paper
- Twine or string
- Scissors
- Hole punch
- Clear tape or removable adhesive hooks
How to Make It
- Gather artificial fall leaves or cut leaf shapes from red, orange, yellow, and brown construction paper.
- Punch a small hole near the top of each paper leaf, if needed.
- Thread the leaves along the twine, spacing them evenly to create a balanced garland.
- Tie small knots around the leaves or secure them with tape to prevent slipping.
- Attach the finished garland to a classroom wall, window, doorway, or bulletin board using removable hooks.
2. “Thankful for Our Little Turkeys” Door Display
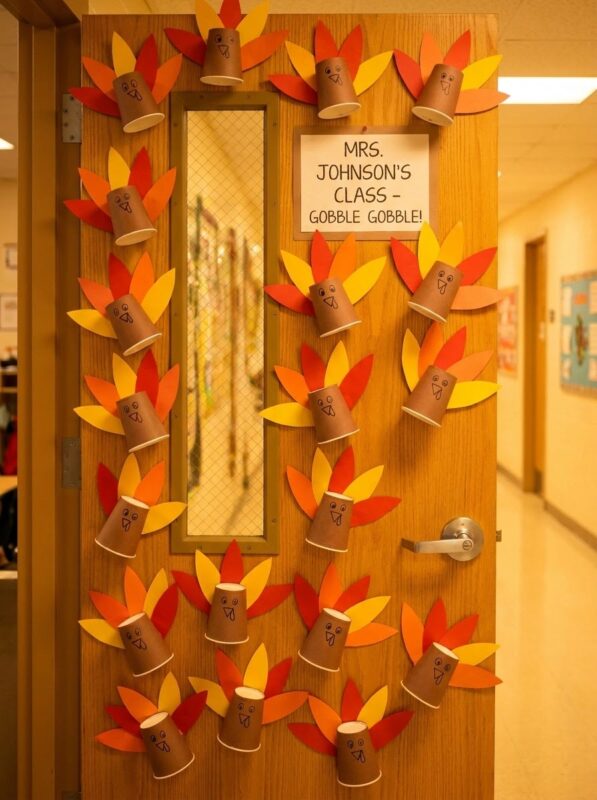
A classroom door covered with little turkeys is a sweet way to celebrate the personalities in your class.
This idea gives each student a turkey with their name on it, then adding a thankful message to bring the whole display together.
Bright feathers, silly faces, and warm autumn colors make the entrance cheerful and welcoming.
The finished door celebrates your students while reminding everyone that gratitude belongs in the classroom.
Craft Supplies
- Brown construction paper
- White paper for the background
- Googly eyes
- Glue sticks
- Scissors
- Black marker
- Letter cutouts or colored paper for the title
- Removable tape
How to Make It
- Cover the classroom door with white or brown paper to create a clean background.
- Cut turkey bodies, beaks, feet, and colorful feathers from construction paper.
- Assemble each turkey with a body, feathers, eyes, and a small beak.
- Write each student’s name on a turkey or one of its feathers.
- Arrange the turkeys across the door, leaving space for the main heading.
- Add the title “Thankful for Our Little Turkeys” using paper letters or a marker.
- Secure the display with removable tape, then check that every student’s turkey is visible.
Mason Jar Leaf Lanterns on the Front Desk

Mason jar leaf lanterns bring a cozy autumn glow to the classroom front desk.
I love how the colorful leaves turn an ordinary glass jar into a seasonal accent that looks lovely beside the teacher’s welcome sign.
The translucent leaves catch the light, creating a warm display near a sunny window.
Arrange two or three jars together for a coordinated look that welcomes students each morning.
For classroom safety, use battery-operated tea lights instead of real candles.
Materials Needed
- Clean mason jars
- Artificial fall leaves or thin pressed leaves
- Mod Podge or clear-drying craft glue
- Foam brush
- Battery-operated tea lights
- Twine or ribbon (optional)
How to Make It
- Wash the mason jars thoroughly, then let them dry completely.
- Brush a thin layer of Mod Podge onto a small section of the jar.
- Press a leaf onto the adhesive and smooth it gently with the foam brush.
- Repeat with additional leaves, overlapping them slightly until the jar has the desired coverage.
- Apply another thin coat of Mod Podge over the leaves, then allow the jar to dry fully.
- Wrap twine around the rim if desired, then place a battery-operated tea light inside.
- Arrange the lanterns on the front desk, keeping them away from the desk’s edge.
Ceiling Swag Autumn Leaf Banner
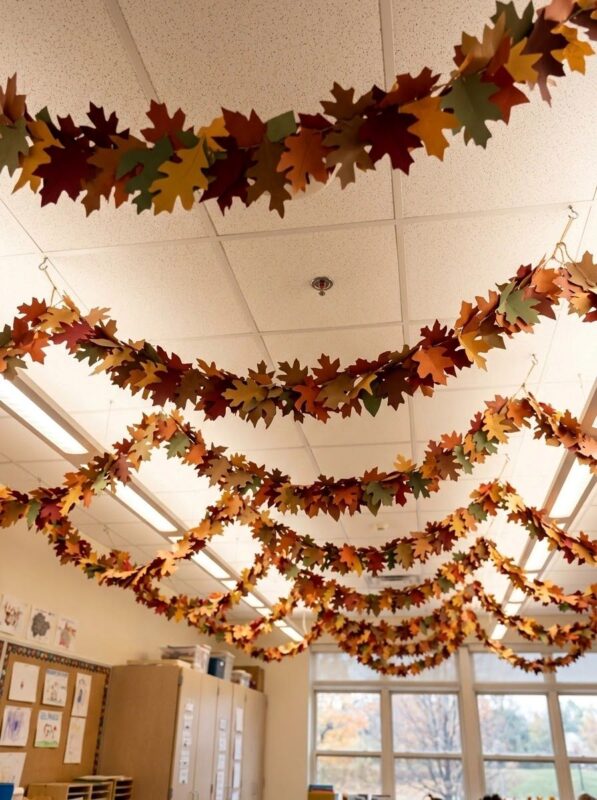
An autumn leaf banner adds color to an otherwise plain classroom ceiling.
This project brings seasonal charm into the room without taking up valuable wall space.
Paper leaves in rich fall shades create a festive canopy above a reading corner, classroom entrance, or gathering area.
Choose a gentle curve for a relaxed look, then repeat the colors throughout the banner to tie the display together.
Things You Need
- Fall-colored construction paper
- Leaf templates
- Scissors
- Pencil
- String or lightweight ribbon
- Hole punch
- Removable ceiling hooks approved for your classroom
How to Make It
- Trace leaf shapes onto construction paper in red, orange, yellow, and brown.
- Cut out enough leaves to cover the planned length of your banner.
- Punch a small hole near the top of each leaf.
- Thread the leaves onto the string, alternating colors and leaving small gaps between them.
- Tie the ends securely and hold the banner up to check its length and drape.
- Attach it with approved removable hooks, keeping it clear of lights, fans, sprinklers, and walkways.
Coffee Filter Turkey Suncatchers
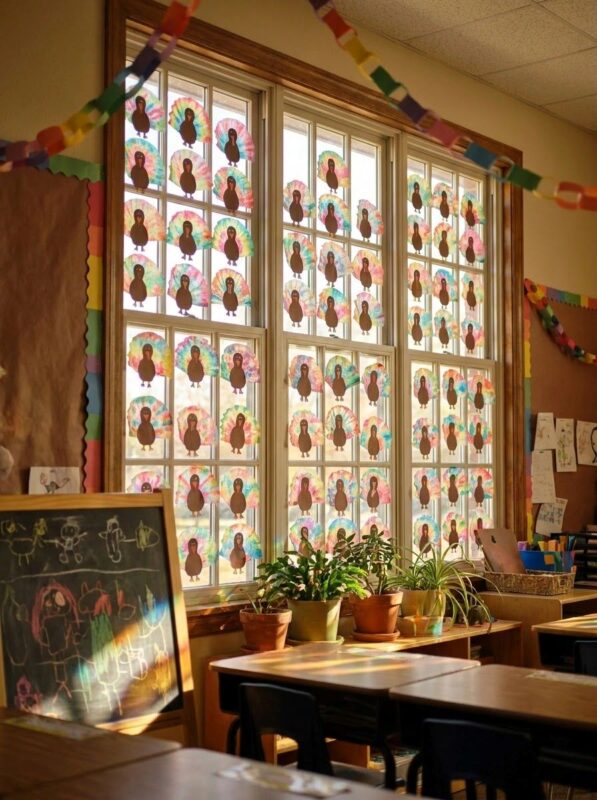
Coffee filter turkey suncatchers turn a simple classroom craft into a colorful window display.
Teachers love watching students blend autumn colors on the filters and discover how the shades spread across the paper.
Once sunlight shines through the finished turkeys, their bright feathers stand out against the window.
Each student’s creation will look a little different, giving the classroom a cheerful display filled with personality.
This project suits a fall art station or a collaborative classroom decorating activity.
Craft Supplies
- White coffee filters
- Washable markers
- Spray bottle filled with water
- Brown construction paper
- Red, orange, and yellow construction paper
- Scissors
- Glue sticks
- Clear contact paper
- Tape
How to Make It
- Flatten each coffee filter and let students color it with washable markers in autumn shades.
- Lightly mist the filters with water and watch the colors spread.
- Leave the filters flat until they dry completely.
- Cut turkey bodies, beaks, and small red wattles from construction paper.
- Fold or gather each dry filter slightly to create a fan-shaped tail, then attach it behind the turkey body.
- Add the beak, wattle, and eyes to finish each turkey.
- Sandwich the finished turkey between clear contact paper or laminate it for extra durability.
- Trim around the design, leaving a narrow border, then tape it to a sunny classroom window.
Gratitude Door Display

A gratitude door display turns a classroom entrance into a daily reminder to appreciate the people that matter.
I like this idea because students get to contribute their own words, giving the decoration a personal meaning.
Each child might write one thing they appreciate on a paper leaf, heart, or colorful note.
As the display fills up, it becomes a shared collection of kind thoughts that students enjoy reading throughout the season.
It’s a thoughtful way to connect classroom decorating with everyday gratitude.
Materials Needed
- Bulletin board paper
- Colored construction paper
- Markers
- Scissors
- Glue sticks or removable tape
- Letter cutouts for the heading
- Leaf or heart templates (optional)
How to Make It
- Cover the classroom door with a background color that complements your autumn theme.
- Add a heading such as “Our Gratitude Grows” or “What We’re Thankful For.”
- Cut paper leaves, hearts, or note shapes for students to decorate.
- Ask each student to write one thing they appreciate on their paper shape.
- Invite students to add small drawings or decorative details around their messages.
- Arrange the contributions around the heading, spreading them evenly across the door.
- Attach each piece securely, then leave room for more messages as the month continues.
Paper Bag Turkey Puppets
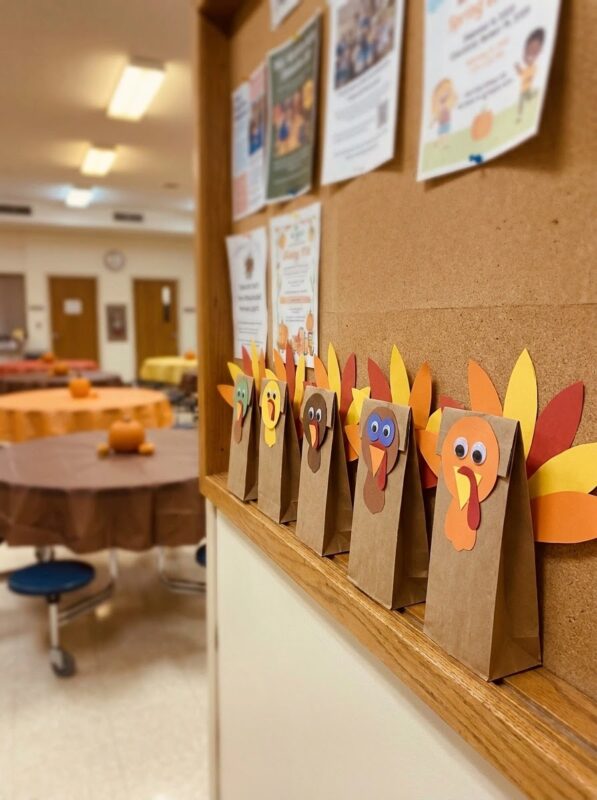
Paper bag turkey puppets bring a little character to your classroom Thanksgiving decorations.
Each puppet gets its own expression, colorful feathers, and silly turkey face, so students have plenty of room for creativity.
Display the finished puppets along a classroom shelf or arrange them around a festive bulletin board.
Brown paper lunch bags make the project affordable, with most supplies already found in a typical classroom craft cupboard.
The puppets double as decorations for a classroom storytelling session.
Craft Supplies
- Brown paper lunch bags
- Construction paper in yellow or brown
- Googly eyes
- Glue sticks
- Scissors
- Black marker
How to Make It
- Place a paper bag flat with the folded flap facing upward to form the turkey’s head.
- Cut a rounded turkey body from brown construction paper, along with colorful feather shapes, a beak, and a red wattle.
- Glue the feathers along the back of the bag so they fan outward.
- Attach the turkey body to the front of the bag, keeping the folded flap free to move.
- Add googly eyes, the beak, and the wattle to create the turkey’s face.
- Draw extra details with a marker, then let the glue dry before displaying the puppets.
Thanksgiving-Themed Entrances
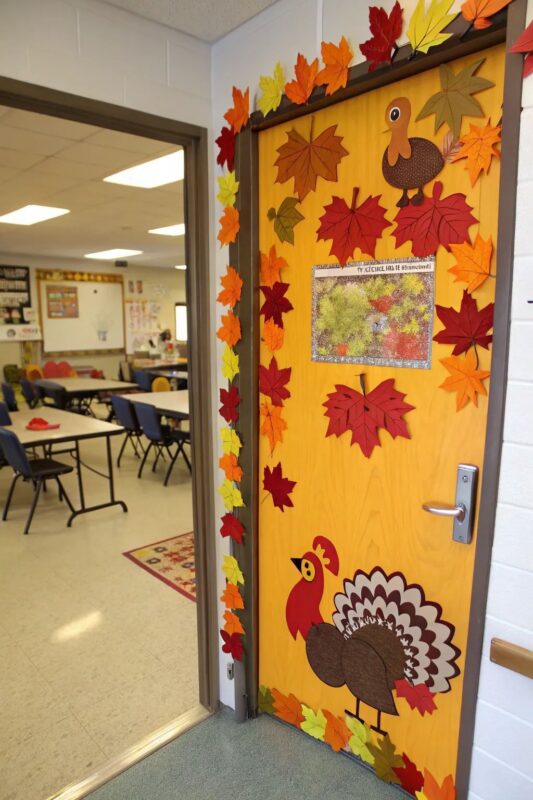
A festive classroom entrance sets the tone before students even step inside.
Autumn colors, welcoming words, and student-made decorations turn an ordinary doorway into a cheerful holiday greeting.
For a cohesive look, carry one theme across the door and its surrounding frame instead of filling every inch with decorations.
A message such as “Gather Here with Grateful Hearts” welcomes students while connecting the entrance to the season.
This display suits classroom doors, hallway entrances, or the doorway to a school library.
Materials You Need
- Brown or orange bulletin board paper
- Construction paper in autumn colors
- Large letter cutouts or a marker
- Artificial fall leaves or paper leaf cutouts
- Scissors
- Double-sided tape or removable adhesive
How to Make It
- Choose a short Thanksgiving greeting that fits the entrance and remains readable from the hallway.
- Cover the door or surrounding frame with bulletin board paper in a warm autumn shade.
- Add the greeting in large letters near the center or top of the door.
- Arrange paper leaves around the lettering to create a seasonal border.
- Add a few student-made turkeys or gratitude notes if the design needs a personal touch.
- Secure all decorations firmly, keeping door handles, windows, and safety signs unobstructed.
Detailed Oak Leaf Wall Collage

An oak leaf wall collage brings the rich textures of fall foliage into your classroom through layered shapes and intricate details.
Oak leaves have distinctive lobes that create an interesting pattern when arranged across a large display.
Mix deep red, burnt orange, golden yellow, and brown paper to create contrast throughout the design.
Students might decorate individual leaves with veins, small patterns, or shaded edges before adding them to the wall.
The finished collage becomes a colorful focal point for a hallway.
Materials Needed
- Construction paper in autumn colors
- Oak leaf templates
- Pencils
- Scissors
- Fine-tip markers
- Colored pencils or crayons
- Glue sticks or removable mounting tape
How to Make It
- Print or draw several oak leaf templates in different sizes.
- Trace the shapes onto colored construction paper, then cut out the leaves.
- Use fine-tip markers to draw detailed veins, outlines, dots, or small patterns on each leaf.
- Add shading with colored pencils or crayons to create more depth.
- Arrange the leaves on the wall, overlapping some edges to create a layered collage.
- Attach each leaf with glue or removable mounting tape, adjusting the layout until the wall looks balanced.
Interactive Thankful Tree Board

An interactive Thankful Tree board grows throughout the season as students share what matters to them.
Start with a large tree trunk and bare branches, then invite each child to add a leaf with a message of gratitude.
The display changes as new leaves appear to give students a reason to revisit the board and read their classmates’ responses.
Some children might write about family, friends, favorite books, or a kind gesture they received.
By the end of the activity, the tree becomes a meaningful record of classroom gratitude.
Things You Need
- Bulletin board paper
- Brown construction paper
- Colored construction paper in autumn shades
- Scissors
- Markers
- Sticky tack, hook-and-loop dots, or removable tape
- Letter cutouts for the heading
How to Make It
- Cover the bulletin board with a neutral background that makes the tree stand out.
- Cut a large tree trunk and several branches from brown paper, then attach them to the board.
- Add a heading such as “Our Thankful Tree” above the branches.
- Cut out paper leaves in red, orange, yellow, and brown.
- Give each student a leaf and ask them to write one thing they appreciate.
- Attach the leaves to the branches using removable adhesive so students can add more later.
- Keep extra leaves nearby and invite students to contribute new messages throughout November.
Handprint Turkey Bunting
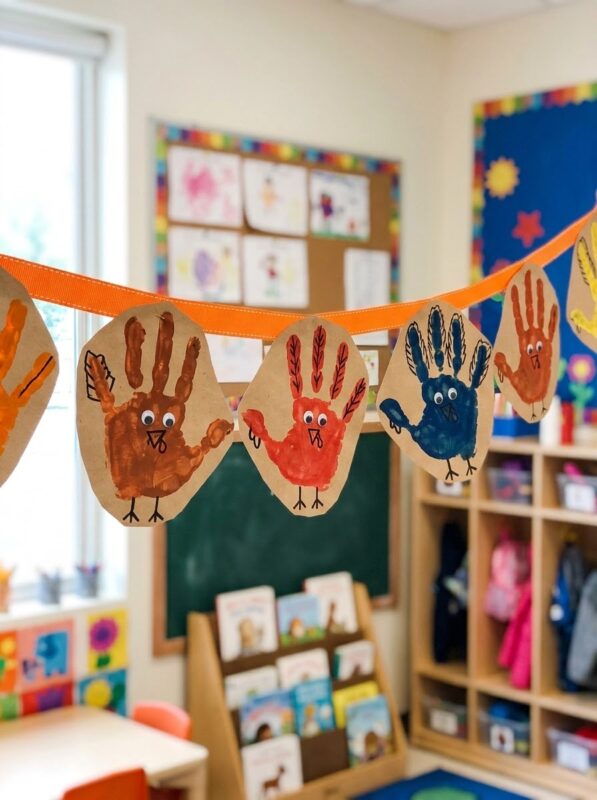
Tiny handprints become colorful turkeys in this charming classroom bunting.
Each student’s hand creates a different feather shape, turning the finished decoration into a personal keepsake of the school year.
Choose autumn-colored paper for a coordinated display, then add each child’s name beneath their turkey.
String the finished pieces across a classroom window, bulletin board, or reading corner.
The bunting brings student artwork into the seasonal décor, giving children a chance to spot their own creations around the room.
Materials You Need
- White or cream cardstock
- Brown construction paper
- Pencils
- Child-safe scissors
- Washable markers
- Glue sticks
- Hole punch
- Twine or ribbon
How to Make It
- Trace each student’s hand onto cardstock, then cut out the handprints.
- Color the fingers in autumn shades or layer colored paper behind each handprint to create turkey feathers.
- Cut small brown circles or ovals for turkey bodies, along with orange beaks and red wattles.
- Glue the turkey body over the palm area, then attach the beak, wattle, and eyes.
- Write each student’s name beneath their turkey.
- Punch holes along the top edges of the finished pieces, then thread them onto twine.
- Hang the bunting across a bulletin board or classroom wall.
Tall, Structural Corner Corn Stalks

Tall corn stalks bring a harvest-inspired look to an empty classroom corner.
Their height draws attention upward, adding dimension to the room without covering valuable bulletin board space.
Green paper leaves wrapped around sturdy stalks create a convincing cornfield effect, while golden paper husks add seasonal color.
Position the display beside a classroom entrance or harvest-themed learning station for a stronger visual impact.
Secure construction matters in busy classrooms where students move between desks.
Required Materials
- Cardboard tubes
- Golden-yellow crepe paper
- Brown kraft paper
- Green construction paper
- Scissors
- Craft glue or strong tape
- Heavy cardboard bases
- Decorative raffia (optional)
How to Make It
- Secure each cardboard tube or dowel upright in a heavy base to prevent tipping.
- Wrap the stalk with brown kraft paper, fastening the edges with tape or glue.
- Cut long, tapered leaves from green construction paper.
- Attach the leaves along the stalk, layering them from bottom to top and bending the tips outward.
- Create corn ears from rolled golden-yellow paper, then wrap them loosely with green paper husks.
- Attach the ears to the stalks at different heights, securing every piece firmly.
- Arrange the finished stalks in a classroom corner away from walkways, door swings, and emergency equipment.
Dyed Clothespin Gratitude Wreath

A clothespin gratitude wreath turns everyday laundry clips into a colorful display of thankful messages.
The wooden clips create a textured wreath that looks attractive on a classroom door.
Students write their gratitude notes on small paper tags, then attach them to the wreath as the display grows.
Warm shades of red, orange, yellow, and brown suit the autumn theme.
The removable notes make this decoration easy to update throughout November.
Craft Supplies
- Wooden clothespins
- Diluted acrylic paint
- Paintbrushes
- Cardboard or a lightweight wreath form
- Small cardstock tags
- Markers
- Craft glue or hot glue, used by an adult
- Ribbon for hanging
How to Make It
- Separate the clothespins by color, then paint them in autumn shades if you prefer dyed-looking clips.
- Allow the clothespins to dry completely before assembling the wreath.
- Cut a wide ring from sturdy cardboard or prepare a lightweight wreath form.
- Clip the clothespins around the ring, arranging the colors in a repeating pattern.
- Cut small cardstock tags and invite students to write one thing they appreciate on each tag.
- Attach the tags to the clothespins, leaving enough space to read the messages.
- Add a ribbon loop to the back and hang the wreath securely.
Faux Acorn Cap String Lights

Acorn cap string lights add a woodland-inspired detail to a classroom’s autumn display.
Small faux acorn caps around individual lights create a textured look that suits a reading nook.
The natural shapes pair well with paper leaves, miniature pumpkins, and harvest-themed artwork.
Choose battery-operated LED string lights to avoid trailing electrical cords across student areas.
Keep the lights as an accent around the display, where their warm glow attracts attention.
Materials Needed
- Battery-operated LED string lights
- Faux acorn caps or clean, dry natural acorn caps
- Lightweight craft foam
- Craft scissors
- Low-temperature hot glue gun, operated by an adult
- Small piece of twine (optional)
How to Make It
- Check that the LED lights work, then switch them off before decorating.
- Arrange the acorn caps by size and discard any cracked or loose pieces.
- Cut small foam or felt pieces to help fill gaps between the caps and light cord, if needed.
- Attach the caps around the light cord near each bulb using minimal glue, keeping glue away from the bulbs and electrical components.
- Allow all adhesive to dry completely, then inspect the strand for loose pieces.
- Switch on the lights and arrange them around a bulletin board or classroom display, following the manufacturer’s safety instructions.
Safety note: Never cover the bulbs or battery pack, and avoid using the strand if any part becomes hot, damaged, or unstable.
Pinecone Turkey Escort Displays

Pinecone turkeys bring a touch of woodland charm to a classroom harvest display.
Their natural shapes provide ready-made bodies, while colorful paper feathers create a bright contrast against the textured pinecones.
Add small name cards to turn the turkeys into place markers for a classroom celebration.
Students enjoy seeing their names beside these little characters, especially when each turkey has its own feather pattern.
Display them along a front desk, on a seasonal shelf, or at each place setting.
Things You Need
- Clean, fully dry pinecones
- Colored cardstock
- Googly eyes
- Orange and red felt
- Child-safe scissors
- Craft glue
- Small cardstock pieces for name cards
- Markers
How to Make It
- Collect firm pinecones, then check them for dirt, insects, or loose scales.
- Cut several feather shapes from colorful cardstock, using three to five feathers per turkey.
- Glue the feathers behind the wider end of each pinecone so they fan outward.
- Cut a small orange beak and red wattle from felt.
- Attach the eyes, beak, and wattle to the front of the pinecone.
- Write each student’s name on a small cardstock card, then tuck it beside the turkey or attach it to a paper stand.
- Arrange the turkeys on a stable surface, keeping small parts away from young children who might put them in their mouths.
Frequently Asked Questions
1. When should I decorate my classroom for Thanksgiving?
Early November is a great time to decorate your classroom for Thanksgiving.
This gives students time to enjoy the seasonal displays and contribute their own artwork before the holiday break.
2. How do I make Thanksgiving classroom decorations more engaging for students?
Invite students to create handprint turkeys, write gratitude messages, or design colorful paper leaves.
Interactive projects help students contribute to the classroom décor while expressing their creativity.
3. How can I decorate my classroom on a budget?
Reuse decorations from previous years, then let students create new pieces to refresh the classroom display.