15 Stylish DIY Christmas Tree Skirt Ideas Anyone Can Make & Sell

Disclosure: This post may contain affiliate links. As an Amazon Associate, I earn a small commission from qualifying purchases at no extra cost to you. Thanks.
A Christmas tree skirt is one of those little details that can change the look of your whole tree.
It hides the handmade Christmas tree stand and gives your presents a lovely spot to sit.
I love making my own Christmas decorations, from DIY ornaments to creative Xmas tree toppers, so this year I wanted to try something different.
A DIY tree skirt seemed like the perfect way to finish my holiday setup with a personal touch.
I found 15 DIY Christmas tree skirt ideas that inspired me to give my Christmas decor a fresh new look.
In the meantime, here are Amazon finds worth your every buck:
Decorate Your Christmas Tree These Fun DIY Tree Skirts
1. Burlap Tree Skirt

Burlap gives a Christmas tree a rustic farmhouse look that never goes out of style.
I like the idea of dressing it up with white flowers and decorative acorn sprigs for a soft winter finish.
The fabric gives wrapped presents a lovely backdrop.
A cardboard base helps hold the shape, and a little stuffing adds fullness to the gathered sections.
This project is a great fit for anyone who enjoys country-inspired Christmas decor with a handmade touch.
Material List
- Burlap fabric (7 yards)
- Artificial white flowers (7 bunches)
- Decorative acorn sprigs
- White ribbon
- Large piece of cardboard
- Scissors
- Measuring tape
- Polyfill stuffing or crumpled paper
How to Make It
- Measure the space around your tree stand, then cut the cardboard into a wide circle with a hole in the center and a slit running to the edge.
- Cut the burlap into wide strips, allowing extra fabric for gathers and ruffles.
- Attach the burlap around the cardboard base, layering the strips until the stand is covered.
- Add polyfill or crumpled paper beneath selected sections to give the skirt a fuller appearance.
- Tie white ribbon around the gathered fabric, then tuck the artificial flowers and acorn sprigs into the arrangement.
Rustic Tip: Leave a little of the burlap’s natural texture visible between the flowers for a relaxed farmhouse finish.
2. Arm-Knit Tree Skirt
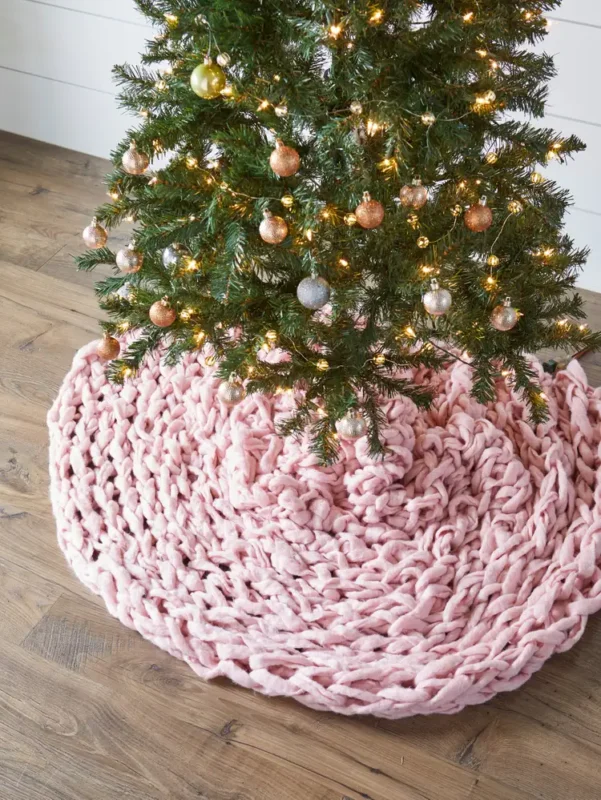
An arm-knit tree skirt brings chunky texture to your Christmas decor, giving the base of your tree a cozy, handmade look.
The thick yarn forms oversized loops that stand out against the green branches.
Source cream-colored yarn for a soft winter look that complements the presents underneath.
Anyone who enjoys knitting but wants to skip the needles should try this project.
The finished skirt folds around the tree stand, creating a plush base that looks lovely in holiday photos.
Materials Needed
How to Make It
- Measure the area around your tree stand to decide how wide the skirt should be.
- Make a slipknot in the chunky yarn, then begin arm-knitting loose, oversized stitches with your hands.
- Continue knitting until the piece reaches your desired length, keeping the stitches fairly even.
- Bind off the final row and tuck in the loose yarn ends.
- Arrange the knitted piece around the tree stand, overlapping the edges slightly to cover the base.
Knitting Tip: Keep your stitches loose enough for your hands to pass through easily, but firm enough to hold the skirt’s shape.
3. No-Sew Ruffle Tree Skirt
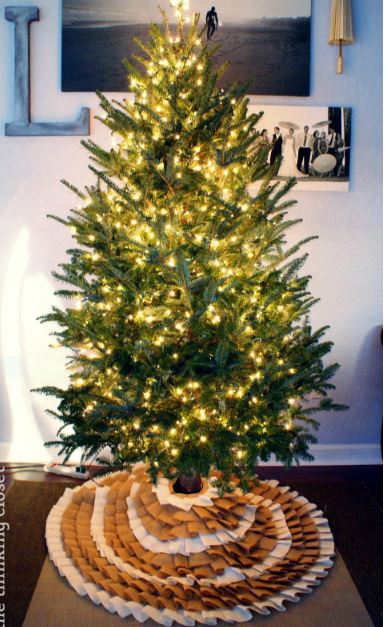
Ruffles give a plain Christmas tree skirt a soft, gathered look that stands out beneath the branches.
Felt is a great base because it holds its shape and doesn’t fray easily.
This project is handy for using leftover holiday fabric, too.
The layered ruffles add texture without requiring a sewing machine, so the skirt suits beginners who enjoy simple crafts.
Choose cream fabric for a classic finish that looks lovely beneath a tree surrounded by wrapped gifts.
Supplies Required
- Felt fabric or an old Christmas tree skirt
- Christmas fabric (4 yards total)
- Measuring tape
- Fabric marker
- Fabric scissors
- Rotary cutter
- Cutting mat
- Acrylic quilting ruler
- Sewing pins
- Hot glue gun and glue sticks
How to Make It
- Lay the felt or old tree skirt flat, then mark a slit from the outer edge to the center opening.
- Cut the extra fabric into long strips for the ruffles, keeping their width consistent.
- Fold small pleats along each strip, securing them with pins as you go.
- Attach the ruffles in overlapping rows with hot glue, starting at the outer edge and working toward the center.
- Trim loose threads and let the glue cool completely before arranging the skirt around the tree stand.
Creative Tip: Test the hot glue on a small fabric scrap first to check that it holds securely without damaging the material.
4. Buffalo Plaid Tree Skirt

Buffalo plaid brings a classic cabin-inspired look to Christmas decorating.
The bold red-and-black checks stand out beneath green branches, giving the tree a cozy seasonal finish.
This skirt is simple to make from plaid fabric, so there’s no need to buy a ready-made version.
I recommend choosing a medium-weight fabric that drapes neatly around the stand without bunching up.
Add wrapped gifts in kraft paper for a rustic display that feels right at home in a farmhouse living room.
Supplies List
How to Make It
- Measure the space around the base of your tree, allowing enough fabric to extend beyond the stand.
- Fold the fabric in half, then mark a large semicircle with a smaller center opening.
- Cut along the markings and make a straight slit from the outer edge to the center.
- Fold the raw edges inward and secure them with fabric glue or iron-on hemming tape for a neat finish.
- Place the skirt around the tree stand, aligning the plaid pattern so the checks look even.
Pattern Tip: Match the plaid lines at the front opening before trimming the fabric for a more polished finish.
5. Cozy Faux Fur Tree Skirt

A faux fur tree skirt gives the base of your Christmas tree a plush, snowy look.
White fur brings a winter wonderland style to the room, especially beneath a tree decorated with warm lights.
The soft texture also provides a lovely backdrop for presents, giving the whole display a cozy finish.
Supplies List
How to Make It
- Spread the faux fur fabric face down on a flat surface.
- Mark a large circle to fit around the tree base, then mark a smaller circle in the center.
- Cut out the skirt shape, followed by a straight slit from the outer edge to the center opening.
- Trim stray fibers around the cut edges, using the tips of your scissors to avoid cutting too much of the fur pile.
- Add fabric glue to any backing edges that need reinforcement, following the product instructions.
- Arrange the skirt around the stand and brush the fur outward to spread the pile evenly.
Finishing Tip: Run your fingers gently through the fur after cutting to release trapped fibers and restore its fluffy texture.
6. Fringed Fleece Tree Skirt

Fringed fleece gives your Christmas tree skirt a relaxed, handmade finish with very little effort.
The soft fabric drapes neatly around the stand, and the fringe adds movement along the edges.
White fleece suits a snowy Christmas theme, giving wrapped presents a clean backdrop.
The project is beginner-friendly because the edges don’t require hemming.
A ribbon tie keeps the skirt in place, so the fabric stays arranged around the tree base throughout the holidays.
Supplies Needed
- Faux fur fabric (2 yards)
- Decorative ribbon
- Hot glue gun
- Fabric scissors
- Sharpie marker
- String
How to Make It
- Lay the fabric flat, then tie the string to the marker to trace a large circle.
- Mark a smaller circle in the center for the tree trunk, then draw a straight line from the outer edge to the middle.
- Cut out the skirt shape carefully, following your markings.
- Cut short fringe strips along the outer edge, keeping the cuts evenly spaced.
- Attach ribbon near the opening with hot glue to create ties for securing the skirt around the stand.
Easy Win: Keep the fringe cuts similar in length for a tidy finish around the skirt.
7. Snowflake Tree Skirt
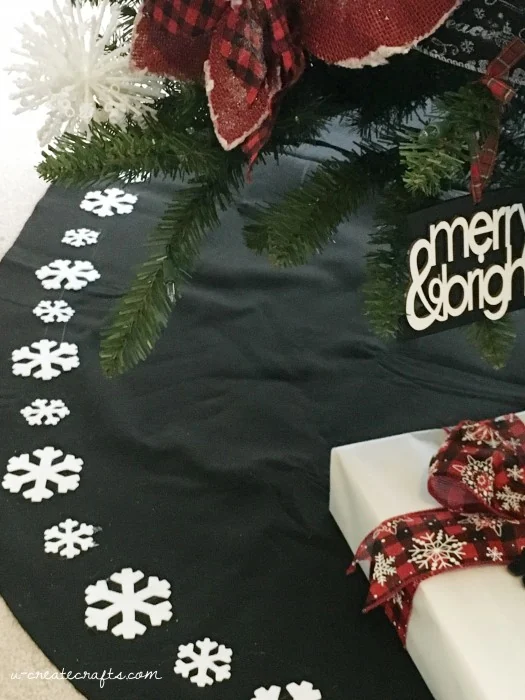
Snowflakes turn a plain felt tree skirt into a festive winter decoration.
I love how white snowflake shapes stand out against blue felt, giving the tree base a frosty holiday look.
Felt is easy to cut, lightweight, and simple to decorate with craft glue.
It’s great for a family Christmas tree, particularly when you want the decorations to follow a winter theme.
The finished skirt looks lovely beneath twinkling lights, with presents arranged around the edges.
Things Needed
How to Make It
- Fold the felt in half, then mark a large semicircle for the skirt.
- Cut a smaller opening in the center, followed by a straight slit to the outer edge.
- Lay the skirt flat and arrange the snowflake cutouts across the fabric.
- Secure each snowflake with small dots of hot glue, pressing gently until attached.
- Allow the glue to cool before placing the skirt around the tree stand.
Decor Trick: Arrange the snowflakes in a scattered pattern instead of straight rows for a more natural snowfall effect.
8. DIY Pom-Pom Tree Skirt

Pom-poms add a playful finish to a handmade Christmas tree skirt.
Cream fabric gives the decoration a soft base, and fluffy pom-poms bring extra texture around the edge.
If you’re a beginner, this idea is easy to customize to suit your holiday decor.
I recommend using white pom-poms for a snowy look beneath the tree.
The finished skirt brings a cheerful touch to the presents gathered around the base.
Supplies
- Felt fabric or faux fur fabric
- White craft pom-poms
- Hot glue gun
- Matching ribbon
- Fabric scissors
- Ruler and fabric marker
How to Make It
- Measure the area around the tree stand, then mark a large circle on the fabric.
- Mark the center opening and cut a straight slit from the outer edge to the middle.
- Cut out the skirt shape, checking that the opening fits around the stand.
- Glue the pom-poms along the outer edge, spacing them evenly.
- Attach ribbon ties beside the center slit so the skirt stays closed around the tree base.
Fine Detail: Use pom-poms of the same size around the edge for a neat, uniform border.
9. Painted Canvas “Rug” Skirt

A painted canvas tree skirt resembles a little decorative rug beneath your Christmas tree.
The sturdy canvas provides a good surface for simple painted patterns, giving you room to personalize the design.
I recommend a natural canvas base with white snowflakes for a rustic winter look.
This project suits anyone who enjoys painting and wants a tree skirt that feels different from traditional fabric styles.
It also stores flat after the holidays, ready for next Christmas.
Supplies List
How to Make It
- Spread the canvas flat and mark a large circle for the skirt.
- Mark the center opening, then cut a straight slit from the edge to the middle.
- Paint a simple pattern across the canvas, using a pencil to mark the design first.
- Leave the paint to dry fully, following the instructions on the product label.
- Trim loose threads and arrange the canvas around the tree stand with the painted side facing up.
Quick Win: Paint a small border around the edge to give the canvas skirt the finished appearance of a decorative rug.
10. Burlap and Bows Skirt

Burlap gives a Christmas tree skirt that charming farmhouse look, with its natural weave and earthy color.
Adding red bows brings a festive accent to the fabric, so the finished skirt looks right at home beneath a traditional Christmas tree.
This project suits anyone who enjoys rustic decorating and handmade holiday details.
The burlap provides plenty of texture on its own, so a few well-placed bows are enough to finish the design.
Supplies List
How to Make It
- Fold the burlap in half and mark a large semicircle for the skirt.
- Cut a smaller opening in the center, then cut a straight slit from the outer edge to the middle.
- Tie the red ribbon into several bows, trimming the tails to equal lengths.
- Attach the bows around the skirt’s outer edge with hot glue.
- Add jute twine along the opening if you want a rustic tie to hold the skirt in place.
Rustic Touch: Keep the bows spaced evenly around the edge for a tidy finish that doesn’t hide the burlap’s natural texture.
11. Classic Quilted Patchwork

A quilted patchwork tree skirt brings a nostalgic, homemade touch to Christmas decorating.
Small fabric squares in festive prints give the design the look of a treasured family quilt.
Red, green, and cream cotton fabrics suit a traditional holiday theme, and the stitched layers give the skirt a little extra weight.
This idea takes more time than a no-sew design, but the finished piece can become part of your Christmas decorations for years to come.
Supplies List
- Christmas quilting cotton
- Cotton batting
- Backing fabric
- Fabric scissors
- Quilting ruler
- Sewing pins
- Sewing machine and thread
How to Make It
- Cut the cotton fabric into equal-sized squares, arranging the prints in a pattern before sewing.
- Sew the squares into rows, then join the rows to form a large patchwork panel.
- Cut the panel into a circular skirt shape, leaving an opening in the center and a slit to the outer edge.
- Layer the patchwork top with batting and backing fabric.
- Stitch through the layers to secure them, then bind the outer edge with a strip of fabric.
- Add ties beside the center slit to fasten the skirt around the tree stand.
Quilting Tip: Lay out all the squares before sewing so the colors and prints are distributed evenly across the skirt.
12. Book Page Upcycled Skirt

Old book pages bring a literary twist to Christmas decorating, giving your tree skirt a vintage paper finish.
The printed text adds visual interest beneath the tree, especially when paired with simple ornaments and warm white lights.
It’s a creative way to reuse pages from a damaged book that no longer serves a purpose.
A sturdy fabric base keeps the skirt practical, while the paper gives it its distinctive look.
Supplies List
How to Make It
- Cut the felt into a circular tree skirt shape, leaving a center opening and a slit to the outer edge.
- Tear the book pages into medium-sized pieces for a layered, vintage appearance.
- Brush a thin coat of craft glue onto small sections of the felt, then press the paper pieces onto the surface.
- Overlap the pages slightly until the felt is covered, smoothing out any large wrinkles.
- Let the glue dry completely, then apply a light coat of clear sealer if suitable for your materials.
- Allow the skirt to dry fully before placing it beneath the tree, keeping it away from heat sources and moisture.
Craft Trick: Tear the pages by hand instead of cutting every piece for a softer, aged-paper effect.
13. Cable-Knit Christmas Tree Skirt

Thick cable-knit texture brings a cozy, sweater-inspired look to the base of your Christmas tree.
Cream yarn gives the skirt a soft winter appearance that suits a farmhouse living room or a neutral holiday setup.
Repurpose an old knitted blanket for a quicker version, or knit a fresh piece if you enjoy working with yarn.
The chunky texture looks lovely beneath a flocked tree, particularly with warm white lights and natural wood ornaments.
Supplies You Need
How to Make It
- Knit a large rectangular panel using a cable-knit pattern.
- Continue until the panel is wide enough to wrap around your tree stand.
- Cut a slit from one edge toward the center, then create a small opening for the trunk.
- Secure loose yarn ends with a yarn needle.
- Add a felt lining underneath if you want extra coverage.
Pro Tip: Keep the cable pattern consistent across the panel for a polished, sweater-like finish.
14. Sewn Fabric Tree Skirt

A sewn fabric tree skirt gives you complete control over the colors, pattern, size, and shape.
Christmas cotton printed with stars and pine branches makes a cheerful base for your tree.
Choose one main fabric for a coordinated look, then add a contrasting border for extra character.
The finished skirt can be folded away after the holidays and reused for years to come.
Supplies You Need
- Christmas cotton fabric
- Coordinating backing fabric
- Fabric scissors
- Sewing pins
- Matching sewing thread
- Sewing machine
How to Make It
- Fold the fabric into quarters and mark a curved outer edge.
- Cut a small opening at the center for the tree trunk.
- Cut a straight slit from the outer edge to the center opening.
- Place the backing fabric underneath, with the right sides facing inward.
- Sew around the edges, leaving a small gap to turn the fabric right side out.
- Close the gap with a neat seam, then add ties along the slit.
Sewing Secret: Press the seams before finishing the edges so the skirt lies flat beneath the tree.
15. Jolly Holly Christmas Tree Skirt

Bring a classic Christmas motif to the foot of your tree with a jolly holly skirt.
Green leaves and bright red berries stand out against a white fabric base, giving the decoration a cheerful traditional look.
Felt holly shapes are easy to cut and attach, so this design suits a simple afternoon craft session.
Arrange the leaves around the outer edge, leaving the center clear so the pattern stays visible beneath the branches.
Supplies You Need
- White felt fabric
- Green craft felt
- Red felt sheets
- Fabric scissors
- Fabric glue
- Red embroidery thread
How to Make It
- Cut a large circle from white felt, then create a center opening and a slit.
- Draw holly leaves on green felt and cut out several matching shapes.
- Cut small red circles for the berries.
- Arrange the leaves in clusters around the skirt’s outer edge.
- Attach the leaves and berries with fabric glue or hand stitching.
- Leave the decoration flat until the glue has dried completely.
Festive Hack: Add small groups of three red berries between the holly leaves for a recognizable Christmas pattern.
Final Thoughts
A handmade Christmas tree skirt is a decoration your family looks forward to seeing every December.
Choose a design that matches your style, gather your supplies, and give an old-fashioned holiday detail your own creative twist.
Who knows, your little DIY project could become a treasured part of Christmas in future.